Premiere Elements 2018 – How To Make A Great Family Video
*Disclaimer: This video was sponsored by Adobe. I am provided with compensation for advertisements on this channel and, possibly, commissions for purchases made through links in this post. All thoughts and opinions are my own and are not influenced by Adobe or its affiliates. My experience is my own, and your experience may differ.
Premiere Elements 2018 is a great video editing platform for all kinds of videos. Whether you have vacation footage to edit or clips from a special event like a graduation, or maybe you have a goal, like me, of creating a yearly recap video of all the fun stuff you did as a family over the course of a year. All of these ideas would make a great family video, so in this post, I’m back with another Premiere Elements 2018 tutorial!
If you haven’t haven’t taken a look at the new Premiere Elements yet (the 2018 version) you can download it here and give it a try (free) for 30 days!
If you’re totally new to Premiere Elements and video editing in general, I have a cheat sheet for you! Click here to grab the cheat sheet now. For more tutorials and how-to videos, be sure to subscribe to the VidProMom YouTube channel as well.
How To Make A Great Family Video in Premiere Elements 2018
Premiere Elements is really great for video editing beginners because it has these Quick, Guided, and Expert Modes. The Quick mode is perfect for total beginners, but in today’s tutorial, I’m going to start with the Expert Mode. Then we’ll move on to a Guided Edit to spice things up with a Freeze Frame Guided Edit. Be sure to click play on the video below or view it directly on youtube.
If you’re making a quick video highlighting a family vacation or special event, you can import your footage into a new project, drop your clips to your timeline, and start editing. But if you want to create something like a yearly-recap video, you likely have A LOT of footage, taken throughout the year, take advantage of the Elements Organizer that comes with your purchase of Premiere Elements 2018.
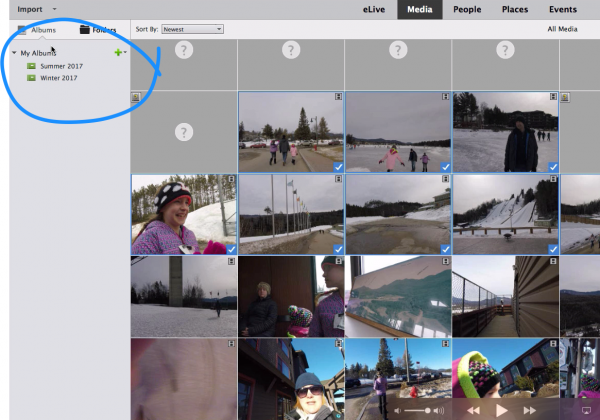
Elements Organizer will scan your hard drive for video files, and you can use it to keep your footage organized throughout the year. By creating separate albums within Elements Organizer throughout the year, all of your clips will be organized and ready for you to edit. Imagine having all your footage for the whole year organized and ready to be dropped onto the timeline for editing!
When it’s time to edit, you can import media from the Elements Organizer. You’ll see your Albums, and you can select your organized media from there.
Once you have your video files imported into Premiere Elements, all you have to do is drag your clips down onto the timeline to get started editing. This is where the magic happens with your video editing! You can use the cut button (it looks like a little scissor tool) to split your files.
Freeze Frame in Premiere Elements
One of the really cool things you can do with Premiere Elements 2018 is to add an animated title with a freeze frame. This would be perfect at the beginning of your video as part of an opening scene.
For this, it’s easy to use a Guided Edit. So under Guided Edit, choose Fun Edits, then choose “freeze-frame with a motion title.”
The really great thing about Guided Edits within Premiere Elements 2018 is that it walks you through making the edit so you don’t get lost in the process. All you have to do is follow each step as it goes and you’ll be editing your very own clip step-by-step. You really can’t mess it up, so let’s check this out!
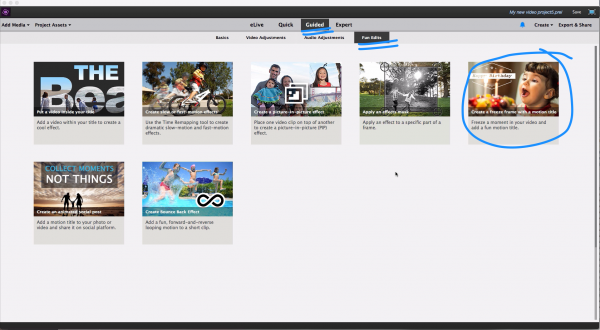
Under the Guided section of Premiere Elements, select “Fun Edits,” then “Create a Freeze Frame with a motion title.” This will start you off with step-by-step instructions for creating a freeze frame, and all you have to do is follow each step.
As you follow each step, simply perform the operation indicated in the instruction window, and the Guided Edit will move you to your next step.

The first step is to select a spot on your timeline where you’d like your motion title to start. This will be the exact spot that “freezes” in your video. After that, you will need to select a motion title from the right, and drag that down to your timeline. As you can see in the next screenshot, this will split your clip and insert the motion title.
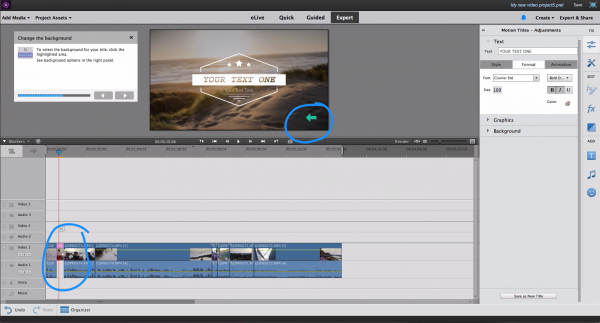
Next, you will see an arrow in your preview pane, and you will click on the background area of the freeze frame. Following the instructions, you’ll use the right-hand menu to select “Freeze Frame” from the drop down menu. This will pull the frame from your own video to use as the “freeze frame” background.
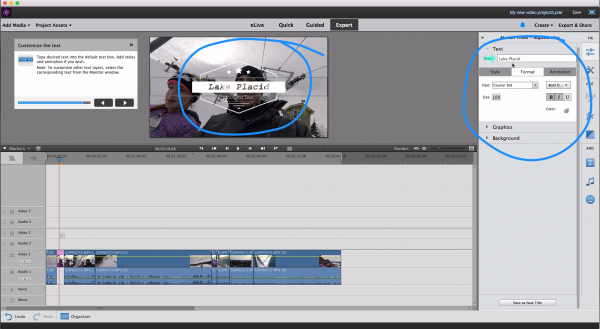
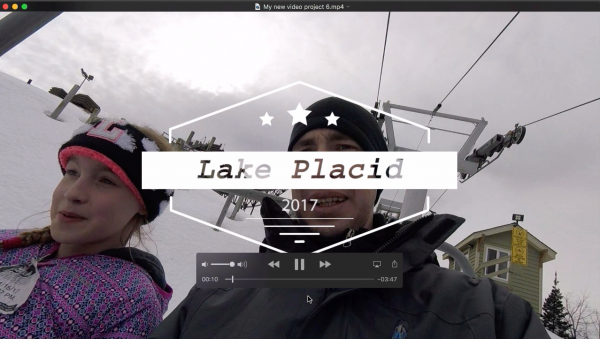
Next, you can modify the text of the motion title so it fits with your video’s theme. For mine, I changed it to “Lake Placid.” You can select the other text boxes and do the same thing (I put the year, 2017).
Once you’ve completed these short, easy steps, you can preview your freeze frame and motion title. If you want to adjust your text, just select it and make your changes.
How to Export in Premiere Elements 2018
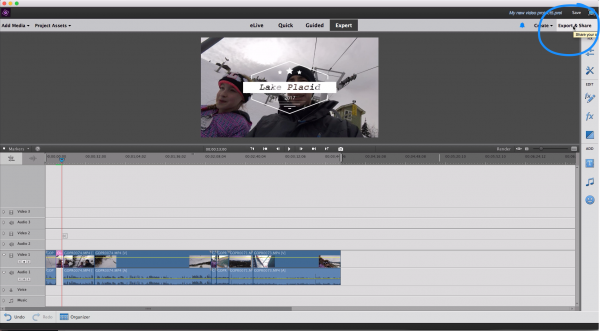
When you’re done with your video and you’re happy with how it looks, you’re going to have to export your project as a video file in order to upload it to social media.
On the right-hand side, you’re going to choose export and share.
The first screen that is going to open up for you is a “quick export.” This will work for most people but what I like to do is choose devices, then choose the HD 1080 option because my footage is in 1080 resolution.
Then you will select a quality setting. I usually go with a medium quality. If you have a really long video and you choose the high-quality setting you’re probably going to have a really large file size. I find that the medium quality setting is usually pretty good for me.
Then you’re going to select a file name and choose your destination.

Once you hit Save, it’s going to take a little while for your project to export. How long it takes is going to depend on how long your video is and how fast your computer is, so just be patient with it!
Once your file is done exporting you can upload it to Facebook or YouTube and share it with your friends and family and then start thinking about your next family video!
So now you know that creating a great family video is fun and easy, once you learn the steps to getting started in Premiere Elements 2018. If you haven’t downloaded Premiere Elements yet, or haven’t upgraded to the 2018 version, you can get a 30-day free trial here.
Be sure to subscribe to the VidProMom YouTube channel so you can be notified of future Premiere Elements tutorials. If you haven’t downloaded my Premiere Elements Cheat Sheet yet, you can download that here!