How to Save in iMovie (Simple Steps Export your Video In iMovie)
Creating a video using iMovie is a relatively process once you get started, but if you’re wondering how to save in iMovie or how to save your iMovie project, things get a little bit confusing.
You’ve set up your iMovie project, done some video editing, and now you’re wondering how to save a video in iMovie? You’re in the right spot! In this tutorial, I will show you the exact steps to export (save) your video in iMovie to a file you can upload to YouTube or Facebook (or save on your hard drive where you can watch it).
Now before we jump into how to save in iMovie, I assume you’ve already imported video clips and done some editing. Be sure to check out my post on importing clips to iMovie if you’re not sure how to get started with editing videos in iMovie!
How to Save Video in iMovie
What you think of as saving a video is commonly referred to as exporting a video. Exporting in iMovie is pretty simple but I want to talk about some of the settings and stuff.
(If you’re wondering about how to save and iMovie project, though, you actually don’t have to worry much about it. Your Mac saves your iMovie project as you work on it.)
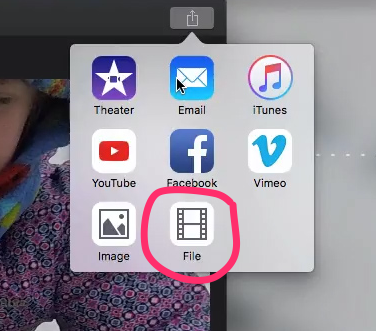
In the upper right-hand corner of the program is the share button, and when you hit that, iMovie gives you a bunch of places to “share” to. We don’t want ANY of those platforms, only the “File” option. So we are basically just saving our editing video as a file right on our hard drive where we can share it on Facebook or YouTube or something later.
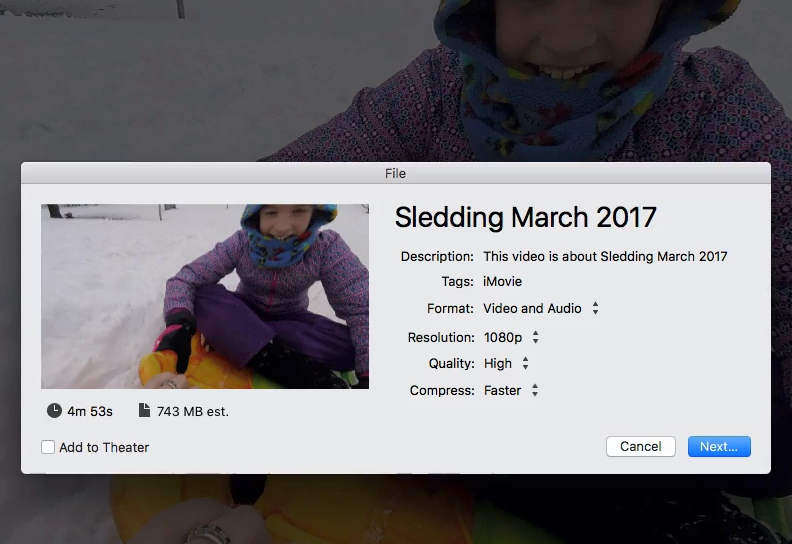
In the export window, you can set your title, plus description and tags, but those two things don’t matter as much during your export. Make sure your format is video AND audio. Choose your highest resolution (mind is usually 1080p), and I recommend setting Quality to “High”.
High Quality vs. Best Quality
I tested both of these options and I didn’t see enough of a difference to warrant the HUGE files size of “best”. The “Best” option comes in at 5 GB (which is A TON) and “High” comes in at under 800kb which is a much more manageable.
When you hit “Next”, you can choose where to save your video to and what the file name should be, then let it save! Once it’s done, you can upload it to YouTube or Facebook.
For some reason, the process to save a video in iMovie is confusing for beginners. There aren’t clearly defined steps within the software to show you how to save in iMovie, so I hope this tutorial has been helpful for you. iMovie is a great video editing software for beginners once you get the details figured out!