How To Edit Videos for YouTube in Premiere Pro
I have been using Adobe Premiere Pro for my YouTube videos since I started on YouTube, and although it took some time to learn, figuring out how to edit videos for YouTube in Premiere Pro is one of the best decisions I ever made! In this Premiere Pro tutorial, I'm going to take you on a walkthrough and show you exactly how I edit my YouTube videos.
Some product links in this post are affiliate links, and I will be compensated when you purchase by clicking our links. Read my disclosure policy here.
How To Edit Videos for YouTube in Premiere Pro
Premiere Pro is used by filmmakers and lots of other professional video people, and I'm not one of those people. I am just a blogger with a YouTube channel. Luckily, I have a subscription to Adobe Creative Cloud, so it didn't cost me anything “extra” to figure out how to edit videos for YouTube in Premiere Pro. I watched many Premiere Pro tutorials when I first started out and played around with it a lot.
Premiere Pro Tutorial
The first time I opened Premiere Pro, all I saw a black screen of nothingness, and I closed it then uninstalled it from my computer. So, I've come along away… because I've been using Premiere Pro for my YouTube videos since I started my channel, so I kinda have my own system and workflow and I want to show it to you in a brief Premiere Pro tutorial.
While I was teaching myself how to edit videos for YouTube with Premiere Pro, I tried to focus on one new skill every week, for every new video. Again, the many Premiere Pro tutorials on YouTube helped me out a lot.
My Premiere Pro Workspace
One really cool thing about Adobe Premiere Pro is that the workspace is totally customizable and you can configure it to your liking. I don't use Premiere Pro's pre-laid out workspaces, I created my own based on what I was used to when working in iMovie and GoPro Studio.

I don't use the Premiere Pro's spaces stuff at the top. I have my own and I call it MYSPACE.
I keep all of my videos in the media bin inside of this one project. That way all my music, graphics, all that stuff is just right there. Sometimes I grab B-roll from a previous video, and it's all right here unless I've relocated it on my external hard drive.
I have a TEMPLATE folder with a media folder, timeline template and a timeline template for a Facebook-sized video. So all I have to do is duplicate this folder, change the name of the folder and the timeline and I'm ready to go.
Import Clips to Premiere Pro
When I import my video files, I put them right inside the Media folder for that project. All I do is drag and drop the clips from my external hard drive to the appropriate folder inside of the Premiere Pro Media Bin.

To start editing my video, I open up the duplicated sequence template. The sequence settings are already set to 1080 resolution, at 30 frames per second. I have some background music already in place, I have my lower third name animation already in place, and I have my end screen already in place.
Creating a Rough Edit in Premiere Pro
So I just start with the first video clip, drag it to the timeline and do a rough edit. I figure out what to cut out, what to keep, and just keep going through all my clips like this. Sometimes I have to watch and re-watch different takes to figure out which one I want to use.
This is basically a “rough draft” A lot of times I'll leave this project for a bit… it depends on how crunched I am for time. But if I can, I let it sit and come back to it the next day or in a couple of days. It's good to have a fresh set of eyes on it if possible.
Making L-Cuts in Premiere Pro
Once the rough cut is complete, then I fine tune everything. I zoom way in, and get rid of dead space and “ums”, and for my jump cuts I actually make them L-cuts. This is a trick I first learned from Amy Landino, and once I realized how much smoother the transition is with an L or J cut, my mind was blown and my life was forever changed.
So to make an L-cut, I drag my the audio down to the next track down, and slide it over. The visual part of the clip will push into the previous clip (basically clipping it) and the audio portion will come underneath the audio portion of the previous clip. So the audio overlaps a little bit, but the visual part is just a regular jump cut.

Doing this is personal preference, and I prefer it. I've been trying to be better at recording so that I can speak normal and natural and not have to do so many cuts. It takes practice, and I'm working on it.
As I go along my timeline to fine tune everything, I might drop in some B-roll, or I might cut to a screencast if I need to. I record my Screencasts in Screenflow, which is a Mac-only program, and I edit the screencast in Screenflow too. So I would drop that in as it's own media file, and just put it on the timeline just like any other clip.
Once everything is in place and edited just right, I have to play around with the end screen. I created an end screen template for myself with these slide in lower thirds that I got from Graphic River (I'll put a link below). I've changed this up a bit recently, but as of right now they are on the left hand side, so I have space below or to the right for my channel subscription end screen element. I put my last few words on the right hand side, a little smaller. And this leaves some room for other video elements on the end screen as well.
I let the music fade right out, and I will watch this whole video all once through before exporting.
Exporting in Premiere Pro
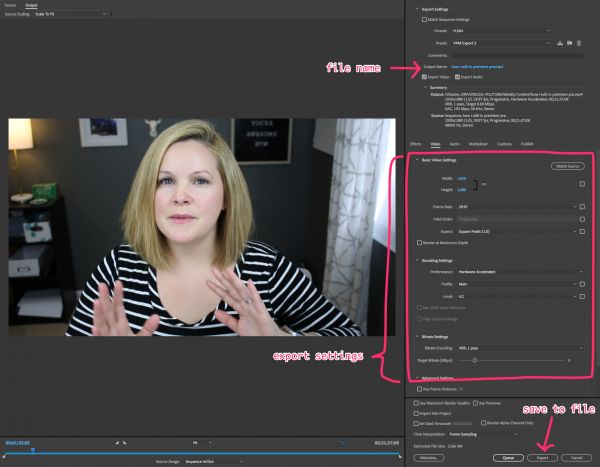
For exporting, these are the settings I use. These are the settings that work for me, and I'm happy with the results. I save this as a preset, so I can reuse it any time I export.
After it's done exporting, I upload to YouTube and then I go through a whole process of publishing the video! I really hope this post was helpful for you in figureing out how to edit videos for YouTube in premiere pro. It's not the most in-depth Premiere Pro tutorial out there, but this is really how I did. I try to keep it simple!
If this post and video were helpful for you, be sure to subscribe to VidProMom on YouTube!