Animated Titles and Text in Premiere Pro
Creating animated titles and text in Premiere Pro might look complicated, but the truth is, it’s easier than ever! In this video, I’m going to show you the trick to Easy Animated Titles and Text in Premiere Pro to add some interest to your videos!
Click here to subscribe to Meredith Marsh on YouTube.
Some product links in this post are affiliate links, and I will be compensated when you purchase by clicking our links. Read my disclosure policy here.
Animated Titles and Text in Premiere Pro
This video is sponsored by Digital Products 669 and you can download the .mogrt files used in this Premiere Pro tutorial here: https://1.envato.market/Ya4om
“Pop” Sound Effect: https://1.envato.market/gdoXA
In this video, you’ll also learn how to use motion graphics files in Premiere Pro (.mogrt files), how to install .mogrt files in Premiere Pro, and how to create professional and eye-catching lower thirds and animated titles and text in Premiere Pro. It’s easy and you’ll love it!
How To Create Awesome Text Graphics?
For a long time, you might have been wondering how to create those flashy and eye-catching animated titles and other text graphics in most YouTube videos. It really looks like something that’s a complicated and time-consuming thing to do but it isn’t.
In this blog, I will try to teach you how to create those professional-looking animated titles and text in Premiere Pro.
Related: Video Editing for Beginners
Step-by-Step Tutorial In Creating Text Graphics
In this tutorial, we will create animated text and titles in Premiere Pro using the motion graphic templates provided by Digital Products 669 here. Those are also known as “.mogrt” files and they are easy to use.
Once you’ve downloaded the files pack, extract the contents of the zip pack so we can now start editing.

1. Adding .mogrt files to Premiere Pro
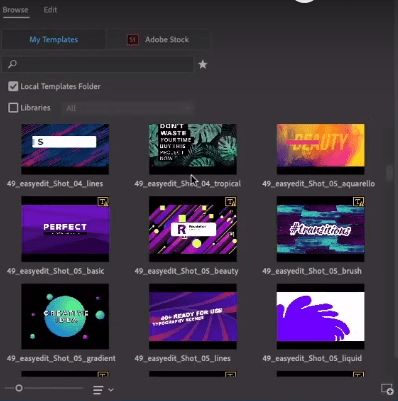
When you’re already in Premiere Pro, look over the essential graphics panel where you will already see some available templates within Premiere Pro, but the one we’ve downloaded will give us more options and cooler effects.
There are 2 ways to add your .mogrt files in Premiere Pro: the fast way and the slow way. First, the slow way. In the screenshot above, you will see a button with the “+” icon on the lower right of the picture. Click that, then go to the directory of your .mogrt file and select which one you would like to add. It is the slow way because you can only add one .mogrt file at a time.
Fast way to add mogrt files in Premiere Pro (For MacOS)
- Click the “Go” in Finder.
- Hit the “Option” key on your keyboard then choose the “Library”.
- Once it opens the folder, click the following: “Application Support”, “Adobe”, “Common”, “Motion Graphic Templates”
- After that, copy the folder of your .mogrt file into the “Motion Graphic Templates” folder.

2. Using .mogrt files in your project
Once you’ve added your desired .mogrt file to Premiere Pro, you’ll just simply need to select the text effect that you want and drag it to the timeline. It acts the same way as your other media files; you can trim it, cut it, and so on. You can also change the colors, fonts, positioning, and everything.
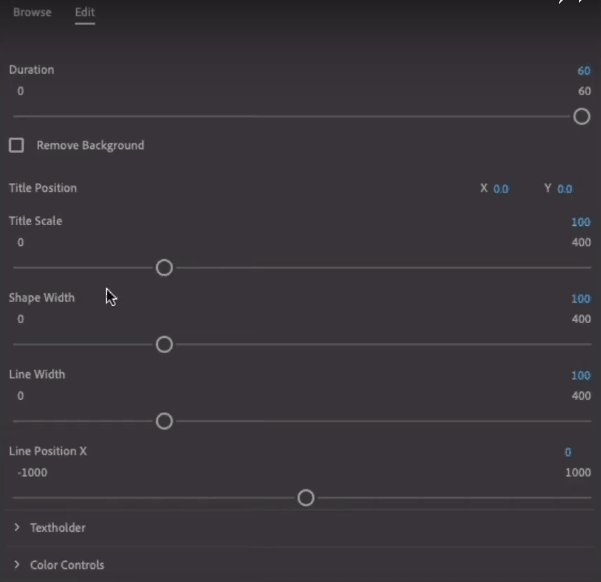
To edit the selected template, just make sure to select the motion graphic file in your timeline, then you can customize it using the different options under the “Essential Graphics” panel. From there, you can start customizing and creating your animated text.
There are actually many customizations that you can do to the motion graphic templates. You can change the color themes for your branding, you can change the speed, fonts, remove the background, and so on.
Once you’re already done with the video and you’re now ready to export it, you would just need to export it the same way as you would normally export your videos. These text graphics perfectly go with some sound effects which you can also find in Envato’s website here. You can now create animated titles and text graphics in Premiere Pro. Enjoy!
Be sure to subscribe to the VidProMom YouTube Channel so you don’t miss fresh new videos from Meredith! Click here to subscribe now.


