Save Time with THIS YouTube Video Editing Workflow
Some of you asked about my YouTube video editing workflow, and of course, I’m here to share how I edit my YouTube videos so you can pick up a tip here and there to improve your workflow.
Save Time with THIS YouTube Video Editing Workflow
Click here to subscribe to Meredith Marsh on YouTube.
In this video, I am walking you through my video editing workflow for my YouTube videos. It’s a pretty simple process, and you don’t have to be a Premiere Pro wizard to copy my workflow. In fact, you don’t need to use Adobe Premiere at all. Use whatever video editing software you are already comfortable with and follow the same process.
Some product links in this post are affiliate links, and I will be compensated when you purchase by clicking our links. Read my disclosure policy here.
Links Mentioned in the Video:
- Giant Post-it Notes: https://vidpromom.com/planning
- G-Technology Mobile Hard Drive: https://www.amazon.com/dp/B076XSHQFJ?coliid=I3Q0FKN1K1X79P&colid=1U0UAMXWXXY0X&psc=1&linkCode=ll1&tag=vpmblog-20&linkId=f3a0cd92759e3105e313a08099ab32df&language=en_US&ref_=as_li_ss_tl
- All my Gear: https://vidpromom.com/gear
- Free Trial of Epidemic Sound: https://vidpromom.com/epidemicsound
My YouTube Video Editing Workflow
Editing videos is something that can be really overwhelming, especially for those who are not yet used to it. The only solution to that is to stick to a specific YouTube video editing workflow every time you will edit a video. Moreover, some would tend to spend chunks of time just to learn video editing rather than actually finding an easier and faster way to do it.
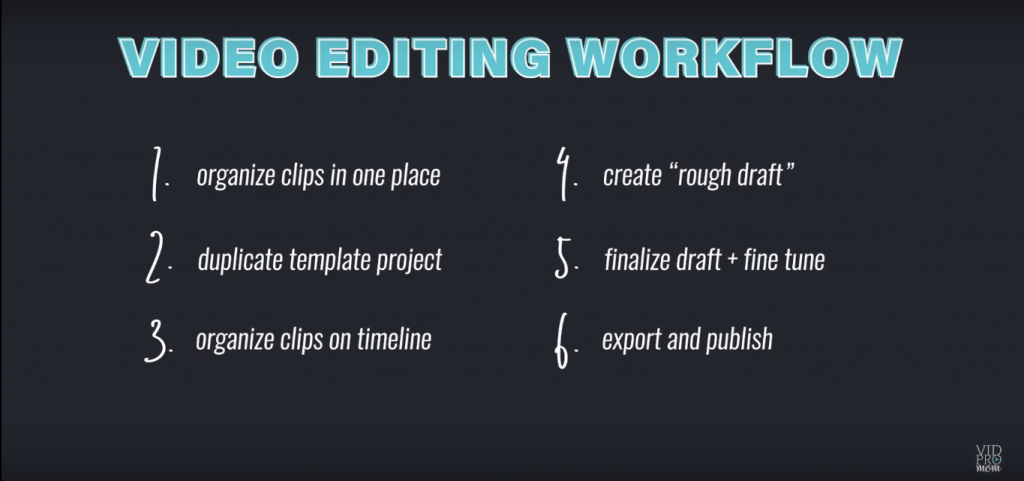
Organize your clips
Make sure that your clips are all organized in one place. Your screencasts, a-roll, b-roll, voiceovers, and so on, be sure to put them all in a specific folder. For me, I use a 1 terabyte hard drive that Google sent for me. It’s fantastic, lightweight, and very portable. If you want to know more about it, just click here.
For me, I like to personally keep all the clips and assets that I need into one specific hard drive. I create a specific folder for my vids and that is where I put all of the clips that I might use.
Duplicate template project
I use Adobe Premiere Pro and if you will see, I just use the same exact project file for the videos. Also, keep in mind that this process is really dependent on the software that you will use to edit. In Adobe Premiere, there is an option to duplicate the file where the sequences are also set up. I have also set my default settings like the frames per second, the screen resolution, and so on, which makes it easier for me.
Now if you’re using different platforms such as iMovie, you can still set up a template with your logo, graphics, background music, and so on. Then, just duplicate the project. Most of the great video editors know about this, and a great video editing software would let you do this action.
Organize clips on the timeline
Once I’ve imported all of my clips and assets on my editing software, that is when you start organizing the clips on the timeline. You just have to drag a certain clip down to the timeline. Another tip when editing video is to leave some spaces between the clips in the timeline so that I can adjust it when needed. It also helps you define whether you still lack some clips or anything.
Create a “rough draft”
In this stage, you will need to scrub your entire sequences. One tip that I’ve learned from Justin Brown is to edit the video backward. It will help you see some spikes in your audio clip, and that is an indication of poorly recorded audio so I should record again.
Creating a rough draft also includes the removal and addition of some elements. It enables you to determine the things that you don’t need in your video. A rough draft requires you to go over and over through the whole video to make sure that it’s spotless.
Finalize the draft
After creating a rough draft, the second to the last step is to fine-tune the video and final edit for some tweaks and adjustments. This is also the part where you add the background music, sound effects, synchronize the clips and many more to polish the video.
This is one of the most critical parts of my YouTube video editing workflow because this is where you make sure that everything in your video is perfect and fine-tuned already.
Export and upload
The last step of our YouTube video editing workflow is to export your video into a file that is compatible with YouTube. Also, this process can be very different when it comes to different video editing software.
In addition, you can have predefined presets for the export settings in Premiere pro. Then, make sure that your export settings are already as good as how you planned it—the bitrate, resolution, file format, and so on. Another thing to keep in mind is that different video editing software might also use different labels and terminologies.
Related: Video Editing for Beginners
So that is my step-by-step YouTube video editing workflow, and be sure to always check and watch the video first before actually uploading it to YouTube. Also, you can create a backup of your files so that you have a copy of it for future use. If you want to know more about my different workflows, you are welcomed to visit my YouTube channel anytime!
Be sure to subscribe to the VidProMom YouTube Channel so you don’t miss fresh new videos from Meredith! Click here to subscribe now.