Record Yourself and Your Screen at the Same Time
There are a few different options for how to record yourself and your screen at the same time, and in this video, I’ll show you 5 easy ways to get the job done so that you can record your screen AND your face at the same time. This works for recording screencasts for YouTube videos and some of these screen recording software options work for Livestreams too!
Some product links in this post are affiliate links, and I will be compensated when you purchase by clicking our links. Read my disclosure policy here.
Record Yourself and Your Screen at the Same Time
In some places, physical meetings or classes are not yet highly recommended, so online platforms are being utilized instead. We cannot deny that there are some more limitations to online meetings than those of physical ones.
One of those limitations that you might encounter is to record yourself and your screen at the same time. Not all online platforms are suitable for that, so let me show you 4 apps that you can use to record yourself and your screen at the same time.
Watch Video: Record Yourself and Your Screen (at the Same Time)
1. Record your Face and Screen with Descript
Descript is a fantastic tool for recording your face and your screen simultaneously. It works on both Mac and PC and can be used to record anything on your screen, from Google Slides to software applications. The best part is that Descript records your face and your screen as two separate files, giving you the flexibility to edit them differently. This feature enables you to have just your face or just your screen on display, split the screen in half, or create a picture-in-picture scenario.
Additionally, Descript comes with AI functionality, automatically turning your video into a transcript and allowing you to edit your video like a document.
Related: Descript Video Editing
2. ScreenFlow Screen Recording
Unlike Camtasia, ScreenFlow only caters to Mac users. It is not available for Windows. Also, it does not have a free trial available so you need to purchase it before you can start using it. You can check their pricing on their website or in the image below.
To start recording, you can simply select “New Recording” from the welcome window of ScreenFlow. Then, a new window will pop up that lets you configure the sources you would use for your recording.
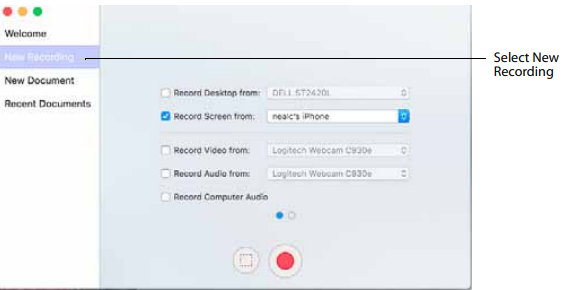
Record Desktop From is the option where you could choose which display to record. However it cannot record multiple displays simultaneously.
Record Screen From is the option to select which device you want to screen record. You should make sure to connect your device to your Mac if you want to use other devices for screen recording.
Record Video From lets you record video from any camera that is connected to your device. If you want to record yourself and your screen at the same time, make sure to check the boxes for both record screen and record video.
Record Audio From is the option if you’re going to use a microphone for your recording. Once selected, the volume will be displayed below.
Record Computer Audio lets you record all the sounds that will be coming from your computer. Make sure to also download the ScreenFlow audio driver so you can use this feature. If you haven’t installed that yet, it will prompt you.
Once you’re all set and done with the configurations and the sources that you’ll use, you can simply hit the record button and start with your recording.
Related: See if Screenflow will work for you… it’s one of my favorites!
3. Camtasia
One of the best apps to use is Camtasia. What’s good about this is that it lets you record literally anything you want on the screen. You can record the full screen, set specific dimensions, a specific window, or an application.
Another great feature is its very user-friendly interface. It does not look complicated at all. So if you’re new to this software, you can easily get the hang of it. Below are the images of what it looks like for Windows and Mac users.
To record yourself while recording your screen, just turn the camera on in the settings. Then, you can simply hit record to start recording once you’re set.
You can also adjust your microphone volume to match the volume of the sounds in your presentation on the screen. If you’re not going to use your microphone or the screen audio, you can also disable it anytime. You can check their site here to see their pricing. They also have a free trial available.
Related: See if Camtasia will work for you!
4. Zoom
It is no surprise to see Zoom on this list. It’s one of the best platforms to use for online meetings because it’s totally free. In addition, you can easily record your screen and video at the same time through this app.
On the opening window of Zoom, you can click “Start with video” if you want to also record your video on camera. If not, just select “Start without video.” Then, there will be a prompt and select “join audio conference by computer” to also record your computer’s microphone.
Now that you are in a meeting without any participants, simply select “Share Screen” and choose what window or app to share. After that, the window that you’re sharing would have a green border to indicate that it is currently being shared.
Now that you’re ready to record, hover your mouse into the green area where your meeting ID is displayed. A menu bar will show up. Click on “More,” then choose if you want to record on your computer or record from the Cloud. Once you’re finished recording, go back to the menu bar, click “more,” and select “End meeting.”
Related: Zoom Tips for Virtual Meetings
5. Canva Screen Recording
Canva offers a feature that allows you to record your face and screen right within the browser, without having to download any additional software. This option is perfect for simple presentations where you want to show your face in a corner while displaying slides. Canva’s solution is user-friendly and straightforward.
6. Loom
Loom is an excellent choice if you need to record shorter videos, with up to a 5-minute recording time on their free plan. As a browser-based option, Loom is easy to use and provides some control over the size of your face compared to the screen, as well as its placement.
7. eCamm Live
Ecamm Live is another platform exclusive for Mac users. It offers a 14-day free trial and you will need to subscribe after that period. Check their site to see their pricing for annual plans and the features included in each package.
As you can see from the image above, there’s an icon on top that looks like a screen icon. You can simply select that to start sharing your screen. There’s also the button to turn your camera on or off. Then, a control bar will pop up on the bottom part of the main window. From there, you can select what specific application to share, zoom in and out on your screen, and close the Picture-in-Picture window.
By default, eCamm Live will also share the audio of your computer when it’s on the screen share mode. You can disable it in the “audio” section of the “Preferences” menu. On the top-right part of the main window, you can select the settings button to adjust the levels of your audio.
Once you’re ready, you can simply hit the blue “Record” button in the main window.
Related: See if Ecamm Live will work for you… it’s one of my favorites!
8. Riverside: High-Quality Browser-Based Recording
Riverside is another excellent option to consider, particularly for those who prioritize video and audio quality. This browser-based podcast recording platform allows you to record your face and screen at the same time while delivering high-quality video recordings. Riverside also features AI transcription tools, adding to its appeal.
Now that you know how to record yourself and your screen at the same time, the next and last thing to do is to pick which software you are going to use. All of them have their own pros and cons, but it’s up to you how you will utilize them properly for your recordings.
Click here to subscribe to Meredith Marsh on YouTube.