Adobe Premiere Rush – iPhone Tutorial
Adobe Premiere Rush is a new video editing app for iPhone and desktop computers that makes it easy to edit videos on multiple devices, to share on YouTube, Facebook, Instagram, or save for later. With the Adobe Premiere Rush iPhone app, you can start an edit on your phone, and sync your edits to Creative Cloud to edit on another device. This is perfect for YouTube creators, Bloggers, and Content Creators, especially considering the ability to edit vertical videos, horizontal videos, and square videos.
In this post and YouTube video, you will learn how to use Adobe Premiere Rush (iPhone version), step by step, as I walk you through Premiere Rush from starting a project to exporting a project.
Some product links in this post are affiliate links, and I will be compensated when you purchase by clicking our links. Read my disclosure policy here.
Adobe Premiere Rush on iPhone
Click here to subscribe to Meredith Marsh on YouTube.
You might have seen that I mentioned Premiere Rush from Adobe in my last post about How to Edit Videos on your iPhone. Today, I’m going to walk you through how to use Premiere Rush for iOS. While I’m using an iPhone for this tutorial, Rush is available as a desktop app for Windows and Mac and soon, there will be a mobile app for Android devices (Adobe says sometime in 2019).
Related: Best Computers for Video Editing
To really understand how to use the Adobe Premiere Rush iPhone app, you really need to watch the full tutorial on my YouTube channel, but I'll walk you through the steps here in this post.
Adobe Creative Cloud (CC)
You do need an Adobe Creative Cloud account to use Rush, but you can use it on a trial basis for free. You can actually create as many projects as you want, but you can only export 3 projects with the free “Starter” account. I really appreciate trial versions of editing programs because it’s like test driving a car… it just makes sense.
To use Premiere Rush, you will need to log into your Creative Cloud Account before starting your project.
Create New Premiere Rush Project
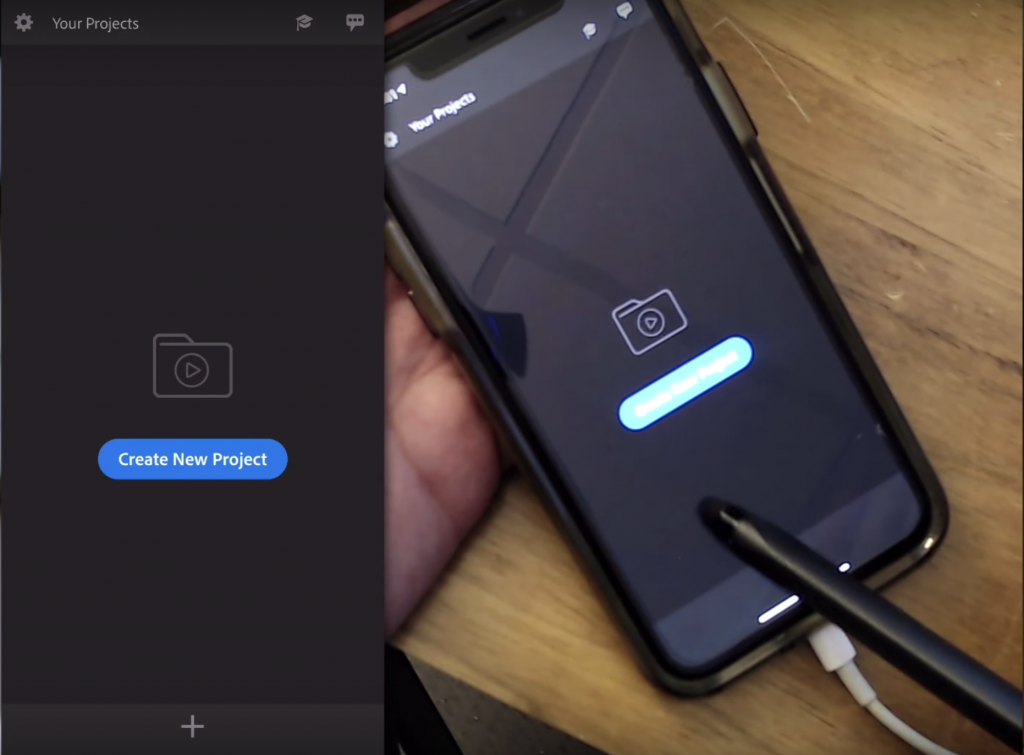
When you open Rush for the first time, you’re probably going to see a blank screen with a blue button that says “Create New Project.”
If you shot video on your phone, you can add your clips from your iPhone's Camera Roll.
For this project, I used some video footage that I shot on a GoPro last summer, at my brother’s wedding, so that’s what I’m going to be editing today. There are myriad of ways to get your video clips onto your iPhone from another camera (or from your computer) so that you can edit those clips with the Adobe Premiere Rush iPhone app (I might do a tutorial on that soon) but I simply put my clips into my Creative Cloud folder on my Mac, and they were able to sync right to my iPhone.
iPhone Video Editing Tip: Use a Stylus!
One of my favorite tips for editing on your phone or iPad is to use a stylus. It just makes it easier to click tiny little things in the app. I use this one.
As you select the files to add to your project, you’ll notice there is a blue number next to each one. You can decide before adding your media which order you want your clips to be in on your timeline, but you can rearrange them later too.
Give your project a name (I called mine Pre-Wedding. I have A LOT of clips from this wedding, and I don’t plan on editing a whole video on my phone, but to make a pre-wedding montage, I think it will be perfect.)
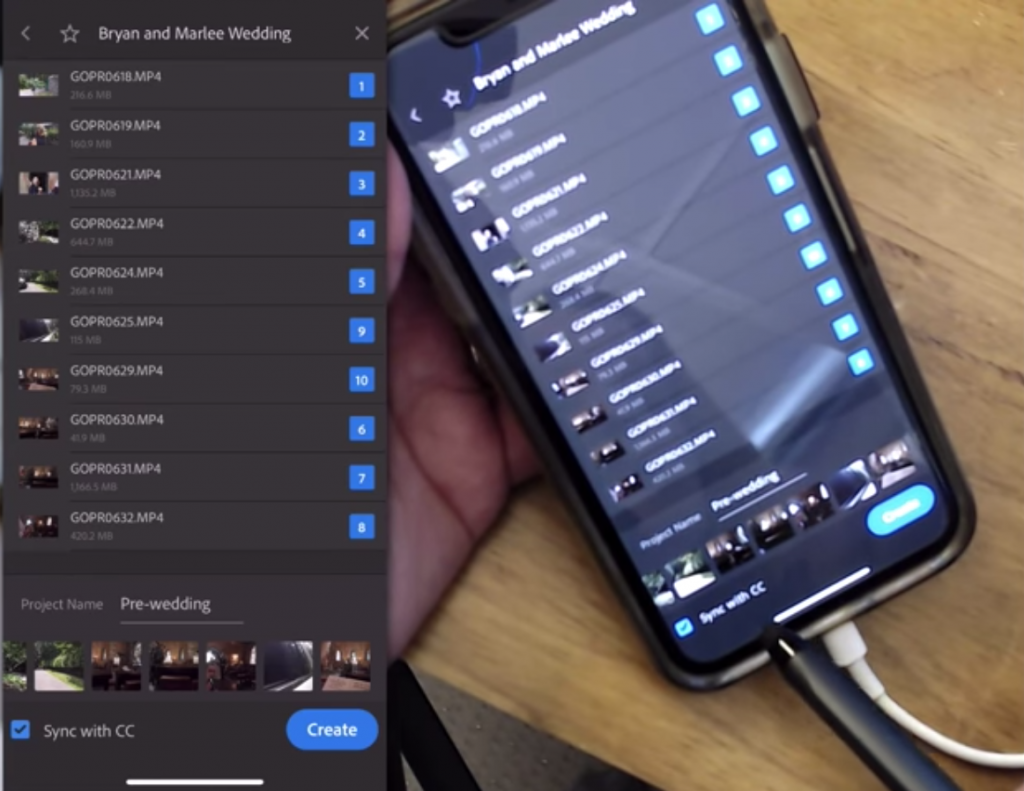
You also want to sync with CC so you can work on this project later on your desktop, so make sure that’s checked, then hit the Create button.
It will take a few minutes for Rush to get your project set up, but once that's done, you'll see your workspace all set up for you with your preview window at the top and the timeline with your clips at the bottom.
Before you begin editing, you can always add more clips from your phone or capture footage with your phone from within the project.
Tap the blue plus sign at the bottom
At the very bottom of the workspace, you will see menu options that scrolls to the left and right. The menus available include your media bin, aspect ratio, titles, transitions, color, audio, and transform.
Next, you'll see the scissors tool, which will split a clip right where
At this point, you can go through your timeline and make your edits: cut, trim, delete, re-arrange.
I mentioned titles, transitions, color, audio, and transform. These menus are a little more advanced, to be sure to watch the full tutorial to understand how they can improve your video project and how to use them.
Premiere Rush Export on iPhone
To export your project, tap the export button on the top right of your project workspace. You can stick with an automatic export where Rush decides what's best based on your project settings, or you can choose a custom export.
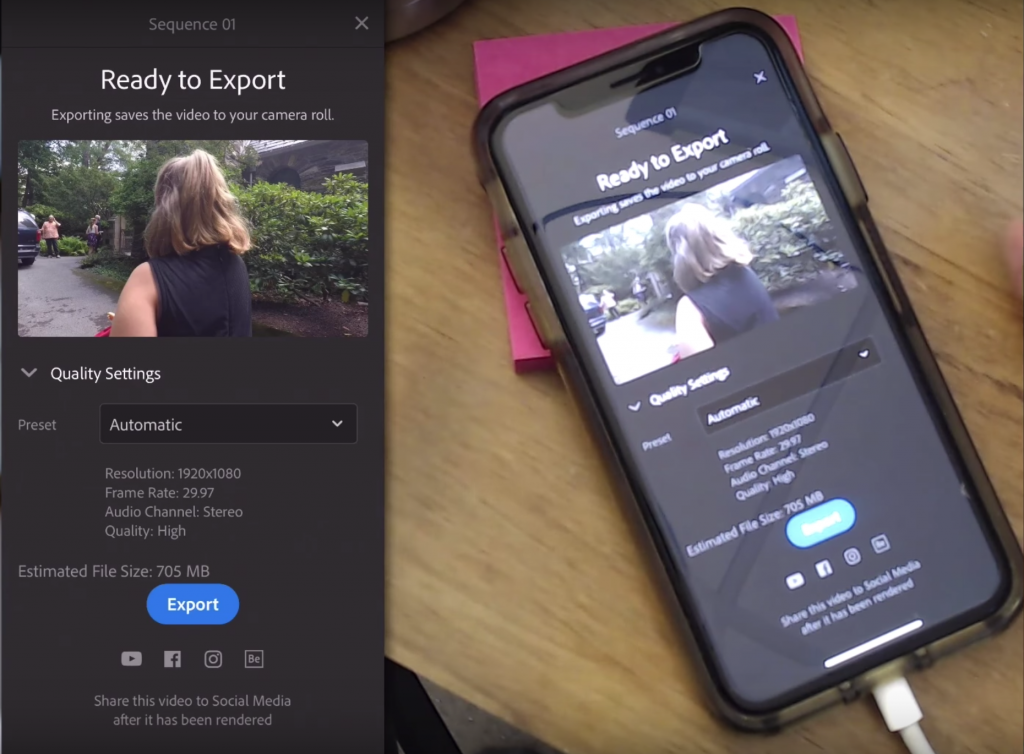
If you want to change your framerate or resolution, you'll want to select your own export settings.
You can also choose to share your video to social media once it's done exporting. Personally, I like to save things direct to the device then upload so you can view it first and make sure it's good to go and THEN upload to social. That avoids some possible complications.
I sure hope this Premiere Rush tutorial was helpful for you. If you have questions about Premiere Rush, leave 'em in the comments below.
Be sure to subscribe to the VidProMom YouTube Channel so you don't miss fresh new videos from Meredith! Click here to subscribe now.