ScreenFlow Editing Tutorial (for Beginners)
In this ScreenFlow editing tutorial, I’m showing you how to edit your ScreenFlow recordings in ScreenFlow 9. This is a perfect video editing tutorial if your brand new to creating and editing screencasts and videos! We’re starting with the basics of editing in ScreenFlow.
Some product links in this post are affiliate links, and I will be compensated when you purchase by clicking our links. Read my disclosure policy here.
ScreenFlow Editing Tutorial For Beginners
ScreenFlow 9 is great for editing your screen recordings. With ScreenFlow 9, you can edit out mistakes and add graphics, special effects. sound effects, and animations. I would like to say ScreenFlow is like my secret weapon when it comes to screen recordings.
In the previous ScreenFlow blog, I explained how to use ScreenFlow 9 Screen Recorder to record your screen. This blog will be a continuation of my ScreenFlow editing tutorial for beginners. We will be diving into a step-by-step tutorial on editing your ScreenFlow recording using ScreenFlow 9.
Related: Complete ScreenFlow Tutorial- ScreenFlow 9 For Beginners
To help you navigate ScreenFlow 9 easily, I created a ScreenFlow 9 Cheat Sheet. It includes keyboard shortcuts and a checklist summary of this video and blog. Make sure to grab it!
ScreenFlow 9 Editing Window
In our editing window, we have the canvas, which is the main part of the window and where all the action occurs. We also have the canvas control, the playback controls, and the timeline area. The canvas control lets you change the size of your canvas if you need to, but you should have selected the desired size when you recorded your screencast. For this ScreenFlow editing tutorial recording, you’ll see in the timeline, there are three tracks from the recording we did previously in the last tutorial video. The first track is my webcam recording with the audio. The second track is the iPhone recording. The third track is a couple of different clips of my actual desktop screen.
Each track composes of multiple clips. They are all essential individual files that were recorded when you recorded your screencast. To see those files within ScreenFlow, go to the properties window and look for the project library, where you will see these files/clips. All the files you see in the project library are also down on the timeline. If you want to include a logo, file, or video, you can drag and drop it into the project library. Drag the video down to the timeline and place it either in a new track or in between the clips.
Splitting Your Clips on ScreenFlow
As a beginner, you may not know how to split and move your clips around the timeline. Well, I’m going to show you how to do it. The basis of what you need to know when you’re just starting with your screencast editing is splitting your clip. This is selecting one clip and breaking it up into two completely different clips. The keyboard shortcut for splitting a clip is hitting the T button.
If you want to get rid of the parts you messed up or had to rerecord in a long clip, here is a quick way to do it. Drag the scrubber bar to the beginning of the section you want to delete then hit the I button on your keyboard, which would create a weird blue thing over it. Next, drag the scrubber bar to the end of the section you want to delete and hit the O button. What we did here was set an in point (I) and an outpoint (O), which created a section. Hit the command and delete key on your keyboard, and it would delete the selected section. The in and outpoint function applies to the entire timeline. When you are using this function, take your clip to another part of the track to prevent it from affecting other
In addition to this ScreenFlow editing tutorial, I created a cheat sheet of all the major commands keyboard shortcuts that I use inside of ScreenFlow, which is the ScreenFlow Cheat Sheet. You can get access it here.
ScreenFlow Video Properties
The Video Properties Panel is where you make changes to any of the recorded or imported video clips as well as images if you import still images. You can also add video actions to a clip and apply video properties to the action.
Before you start playing around with the video properties, make sure you have selected the video where you want to apply the properties. If you have multiple tracks on the timeline, select one of the tracks to apply the video properties.
You can see this better in the ScreenFlow Editing tutorial video here, but here are the controls in the Video Properties Pane.
- Scale: Useful for highlighting a particular portion of the screen or in a video action create a zoom effect
- X/Y/Z Position: X rotates the image along a horizontal axis. Y rotates the image along a vertical axis. Z spins the image along a depth axis.
- Opacity: The greater the value, the more opaque the image. Setting an image to zero which is transparent can be useful for a video voice-over or fading an image in or out. I wouldn’t recommend using opacity for applications with a webcam or a screen recording in the background.
- Cropping: You have options to crop left, right, top, and bottom
- Reflection: It creates a mirror image of the selected clip below the clip itself. When set to zero, the reflection is invisible. I wouldn’t advise this feature with a screencast because it can be distracting to the viewer.
- Corner Round: Adjust the roundness of the corners of the image or video
- Drop Shadow: Create a shadow effect behind the video or still image. This control setting includes angle, color, offset, opacity, and blur size.
- Color Control: This includes saturation, brightness, and contrast. Be careful with this when you are editing your face or a screencast. It can make your video or image look unprofessional.
- Video Filter: Click the plus icon to add filters to the selected clip.
These are the basic controls of the ScreenFlow video properties pane. You can use these properties for any of the files, videos, and images you have on your timeline. A cool feature included in the video properties pane is the action clip. This allows you to create a movement or a transition to change the state of the video file or the image that you’re working with. Actions display as yellow rectangles inside the clip. When video action is added to both the start and end of a clip, it creates a transition. For more details on the action clip and how I used it, check out my YouTube video here.
ScreenFlow Audio Properties
To edit the audio in ScreenFlow, you have to select any clip that has audio, including clips with both video and audio. Just like the video properties, you’re only editing the file selected. If you have more than one file to edit, you have to edit each one separately. Clips with audio display as waveforms inside the clip. The high waveforms like mountains represent when you are speaking, while the lower waveforms are when you are muted, taking a breath, or pausing.
Here are the controls that are in the audio properties pane in ScreenFlow:
- Volume: Provides the audio adjustment for the audio. The volume is at 100% by default, but you can boost or lower it beyond its value. This is great when you have background music playing as you are speaking, and you want to lower or higher your audio as the music is playing.
- Mute Audio: If for some reason, you don’t want audio in your video then click the mute audio button.
- Ducking: This is something you may want to play around with. The purpose is to minimize the audio levels for background music/sounds, where ever there is narration/voiceover playing.
- Smooth Volume Level: Activate a smoothing process to give the audio some consistency.
- Audio Mixer: You can mix, pan, and solo all of your audio channels using the controls in the audio mixer. The controls include gear icon, channel number, audio meter, solo buttons, pan controls, slider, and mix output.
- Effect: Check to activate effect and choose from the pre-set effects in the drop menu. Use the amount slider to adjust the amount of effect you want in your audio.
- Filter: Check Remove background noises to mute or lower the background noises in your audio output. This is great when you record in a busy place or you have an air conditioning system in the background.
For an audio transition to fade in and fade out audio, choose the clip then select edit then add starting & ending transition. This will allow your audio to fade in and fade out in the chosen clip.
ScreenFlow Video Motion Properties
Video motion in ScreenFlow enables you to control the motion of your media. It’s similar but a bit different from the video action clip. The controls for the video motion properties pane are:
- Duration: Determines how long the video motion will occur
- Effect: Click to enable effects, then select the type of effect: Gravity, Spring, or Pulse
- Lock To: Lock the Video Motion to the duration entered in the duration field. This would disable the duration field.
- Preview: Click the triangle to see a preview of your Video Motion
- Apply To: Adjust the position, scale, or rotation of the clip.
Screen Recording Properties in ScreenFlow
Screen Recording Properties helps to enhance your video for your audience. This property is applied only to screen recording clips that were created using ScreenFlow. It would not work on recording clips from other applications.
The controls in the ScreenFlow screen recording properties are:
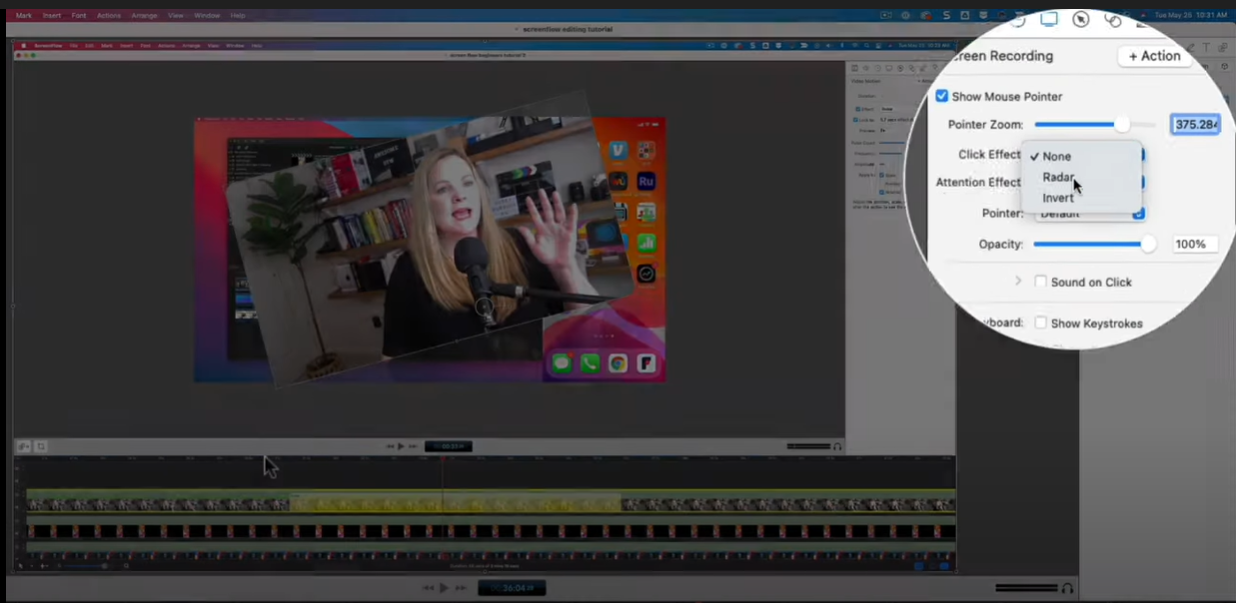
- Show Mouse Pointer: Mouse pointer activity in the screen recording can be either displayed or hidden.
- Pointer Zoom: Increase or decrease the size of your mouse pointer if the Show Mouse Pointer is selected. Increasing the size of the mouse pointer makes it easier for the audience to follow.
- Click Effect: In the popup menu, you can select none, radar, or invert. With the radar effect, you can change the size, color, and duration of the circle. This is useful for situations where you know that your viewers or your video users may need some extra assistance following along with what you’re doing on the screen.
- Pointer: Change the pointer image based on the potions given in the popup menu.
- Opacity: Specifies the degree of pointer translucency
- Sound on Click: Check to have a sound when you click something.
- Show Keystrokes: Displays the keyboard characters of what you typed during the recording.
- Show all Keys: Shows all the keystrokes typed during the recording.
ScreenFlow’s Callout Properties
Callouts enhance your screen recording by highlighting a specific portion of the screen. To create a callout, you have to make sure you have your screen recording file selected on your timeline, then hit the action button over it. To see some examples of callouts on my screen, go to the YouTube video here.
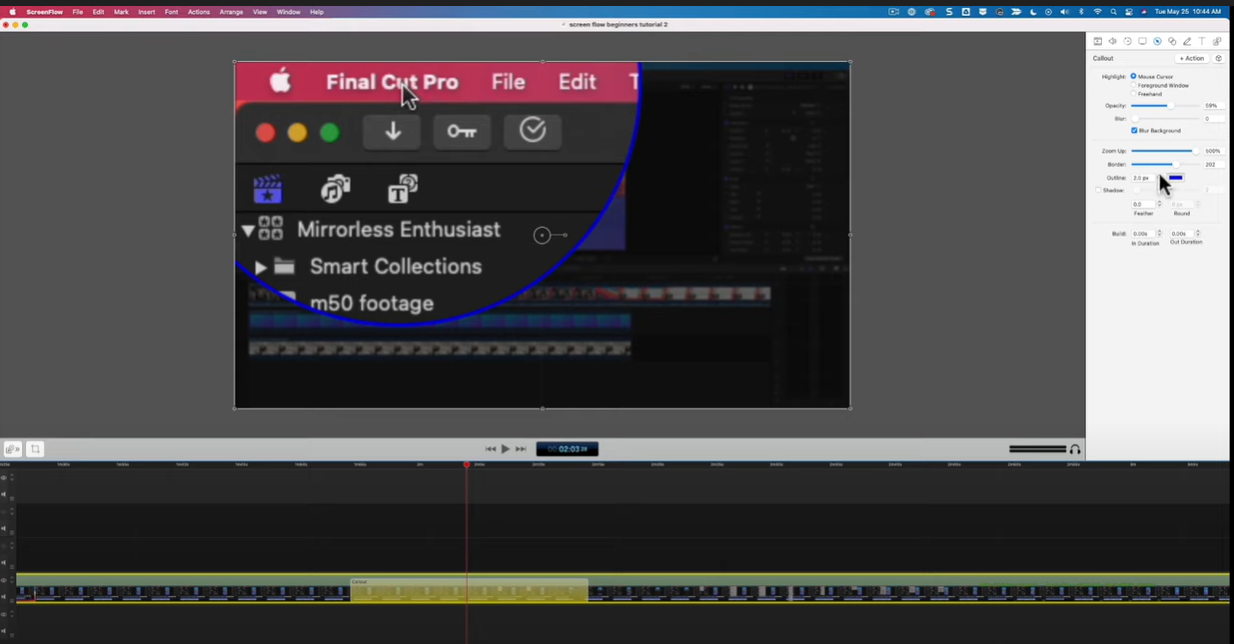
Here are the controls in the callout properties pane.
- Highlight: Select how you would like to highlight an area of recording. Mouse Cursor highlights a circular space around the mouse cursor. Foreground Window highlights the window in the screen recording. Mouse Cursor and Foreground Window can only be added to screen recording clips. Freehand callouts give you more freedom to select the shape of the highlight and where you want the highlight to be. With the Freehand callout, you can select multiple callout areas at the same time. This used in video clips, image clips, and screen record clips.
- Opacity: Control the transparency of the space outside of the callout.
- Blur: Control the blurriness of the callout area.
- Blur Background: Blur the area outside the callout area
- Zoom Up: Increase the area inside of the callout
- Border: Increases the area of the callout. It doesn’t apply to freehand callouts.
- Outline: Creates an outline around the callout area.
- Shadow: Creates a shadow behind the callout.
- Feather: Create a smooth transition from the callout area to the surrounding areas.
- Build: Specify the transition time of the callout.
If you tried the blur control but not getting enough coverage especially for your passwords and logins, you can create your own blur. Select the freehand callout and highlight the area you want to blur. Then hit blur and bring down your opacity to zero. This will remove any obstruction from the audience’s view and blur the section you don’t want your viewers to see. Again you can move the callout anywhere on your timeline.
Touch Callout in ScreenFlow
This works for your iPhone or iPad screen recordings. When it comes to iPhone or iPad recording, it doesn’t show where the user touch. Therefore, the Touch Callout allows the user to manually shows where they touch or select something. It works the same way as Callout Properties, but it’s not as handy.
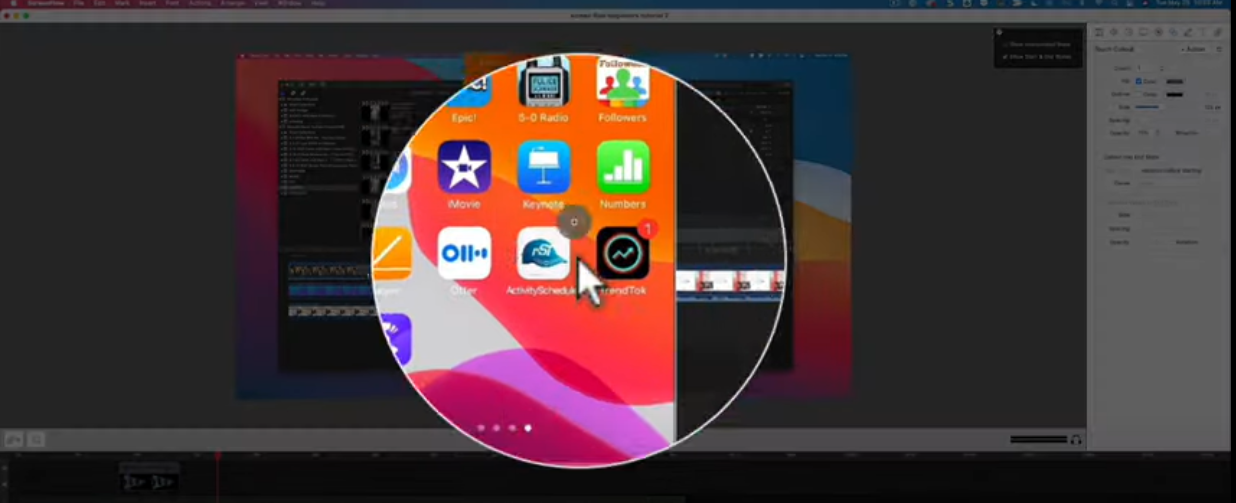
Some of the controls in the touch callout pane are:
- Count: The number of touch callout you want
- Rotation: Set the amount of rotation for a selected touch callout
- Spacing: Create distance between multiple touch callout
- End State: Tell the touch callout the duration to wait before the movement/ animation to the end state.
- Animate: Select if you want to animate the size, spacing, opacity, or rotation parameter of the touch callout
Annotations
They are used to display simple shapes in your screen recording, video clips, images, etc. Annotations are created as a file that you can manipulate, move, and adjust on your timeline. You can also select the annotation, go to the video motion tab, select action and create an actual motion to help draw attention.
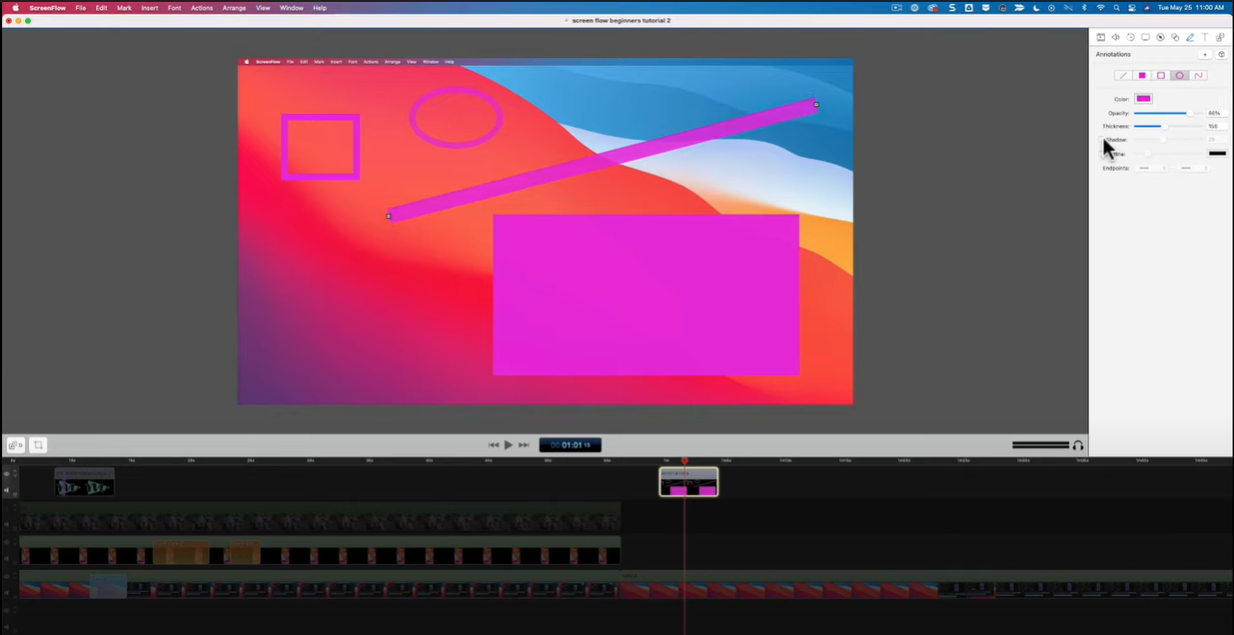
When creating an annotation, you can choose these types of shapes: lines, line (arrow, square, square (filled), and circle. You can change the properties such as color, shape, thickness, shadow, outline, opacity, and endpoint. You can also create a Freehand Annotation that allows you to draw smooth and accurate freehand lines and shapes that can be moved around and resize.
Text Properties
Just like the annotations, the text is added as its own element that can move around on the timeline and be manipulated. The text behaves like an image clip. You can apply the video motion properties and transitions. You can change the properties such as color, font, size, alignment, outline, backdrop, and fill.
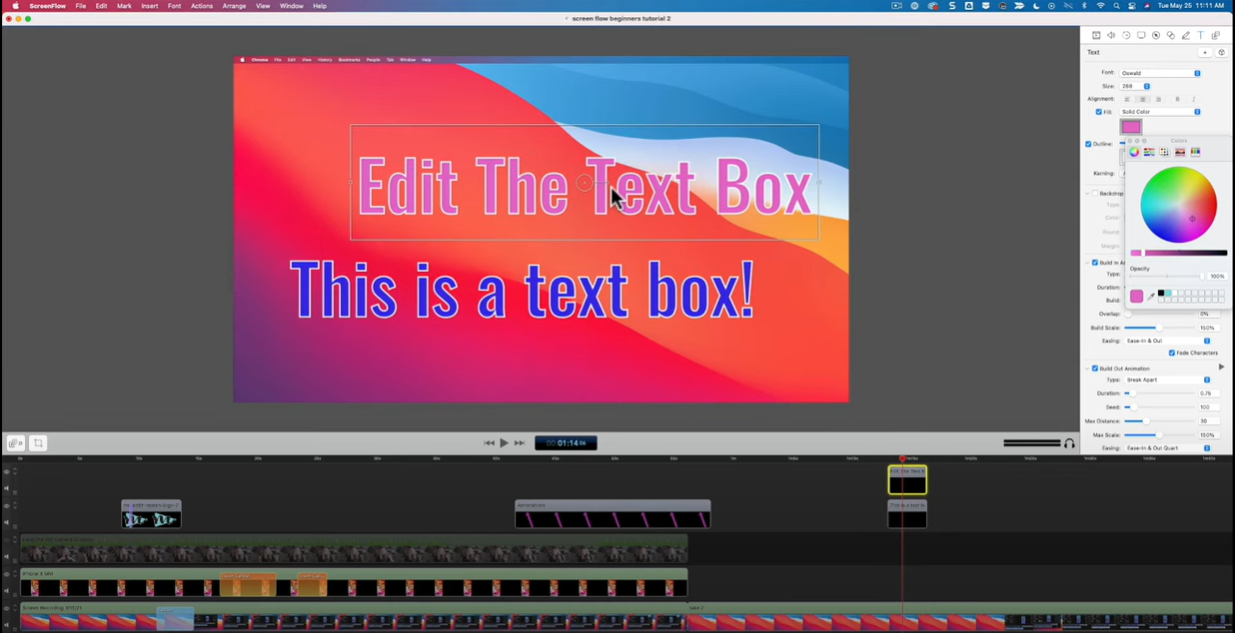
The text properties have an interesting feature that allows you to turn your text into an animation. To do this, select the build-in animation and build-out animation. Build-in animation is when the text is coming into the frame, while build-out animation is when the text is leaving the frame. Some of the effects you can choose are: character flip, gravity, typewriter, break apart, scale, and move. If you have multiple text boxes coming in at different times and doing different things, you’ll have to create a text box for each of those. You can hit the plus button and start from scratch. Another way is to select the text box you have styled, hit copy, and hit paste. It will create another text box for you to edit.
If you want multiple texts to be on the screen at the same time, add another track in your timeline. Then place the text in the timeframe of the screen you want it to show on. Even if you have multiple text boxes on one screen, each will have its own animation, building, color, and font.
Media Library
As I mentioned in the beginning, the media library is where all of your different screen recordings, imported files, and imported images are located. If you ended up deleting something from your timeline and want to add it back again, go to the media library and drag it back to the timeline.
Something else to mention that isn’t in the properties pane is the individual properties of the clips. You can find these properties by clicking the gear icon on the clips. Some of the properties are animation, transitions, and clip inspector. The clip inspector allows you to adjust the speed of the clip by increasing or decreasing the speed. Also, you have the option of playing the clip in reverse.
Speeding Up Clip on ScreenFlow
You can change the speed of the clips individually in the timeline. This is great when you want to quickly go over a process that isn’t super important or slow down a clip you want your viewer to pay more attention to.
There are two methods to change the speed of a clip:
- 1st method: Press and hold the Option ley and move your cursor to the edge of the clip. A clock icon will appear showing that you are changing the speed. When you move the edge of the clip inwards you’re speeding the clip. When you are moving the outward the speed it slowing down.
- 2nd method: Click on the gear icon on the clip you want to change the speed then select Show Clip Inspector. Use the slider or manually change the percentage to adjust the speed.
Conclusion
I know this is a lot of information being thrown at you, but take your time to go over each property. Play around with them and find what works for your videos.
ScreenFlow is literally one of my favorite editing software, and hopefully, it would become your secret weapon as well. Remember to grab my ScreenFlow Cheat Sheet to help you with your ScreenFlow journey.
VIDEO: ScreenFlow Editing Tutorial (For Beginners)
Click here to subscribe to Meredith Marsh on YouTube.