CapCut Editing Tutorial for Beginners (2022)
You have videos to create and this CapCut Editing Tutorial for Beginners (2022) will help you get them done FAST!
Some product links in this post are affiliate links, and I will be compensated when you purchase by clicking our links. Read my disclosure policy here.
Thanks to Epidemic Sound for partnering with me to bring you this Capcut Tutorial! Save 50% on your annual Epidemic Sound plan with code “VIDPRO50” at checkout.
CapCut Editing for Beginners (2022)
If you’re trying to figure out CapCut fast this video is for you. Don’t make the mistake of jumping off the deep end and overcomplicating the editing process right off the bat. You have videos to create. So we’re going to walk through CapCut on my phone step by step following the BFF process. It is outlined in the social video blueprint. Don’t miss any steps there or you may end up with a video that looks or sounds bad.
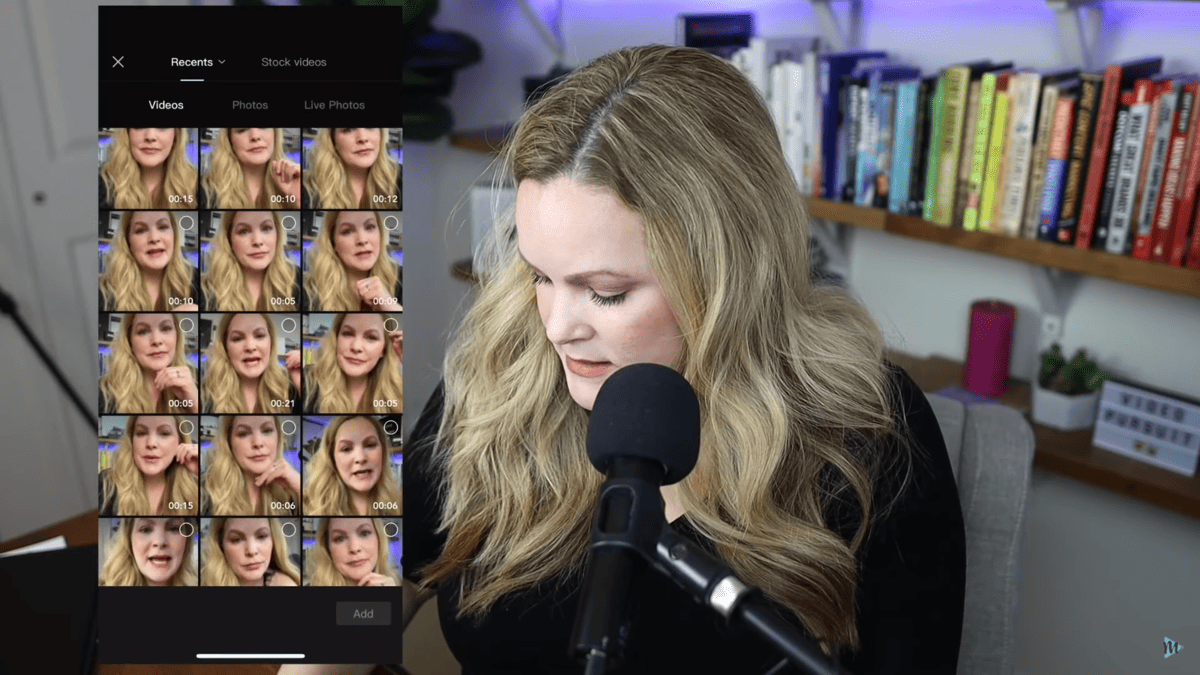
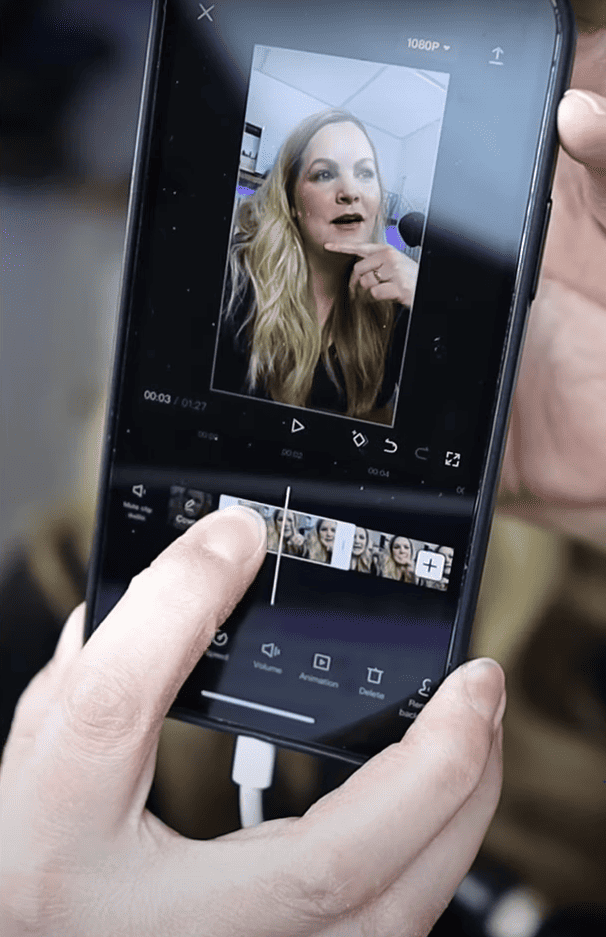
To start off, I’m going to assume that you already have some clips recorded on your phone. I’m going to open up CapCut and start a new project at the top. I recorded something just a few minutes ago, so I have to figure out which of these clips I want to import. I can play each of those clips.
Start CapCut Project and Import Clips to the Timeline

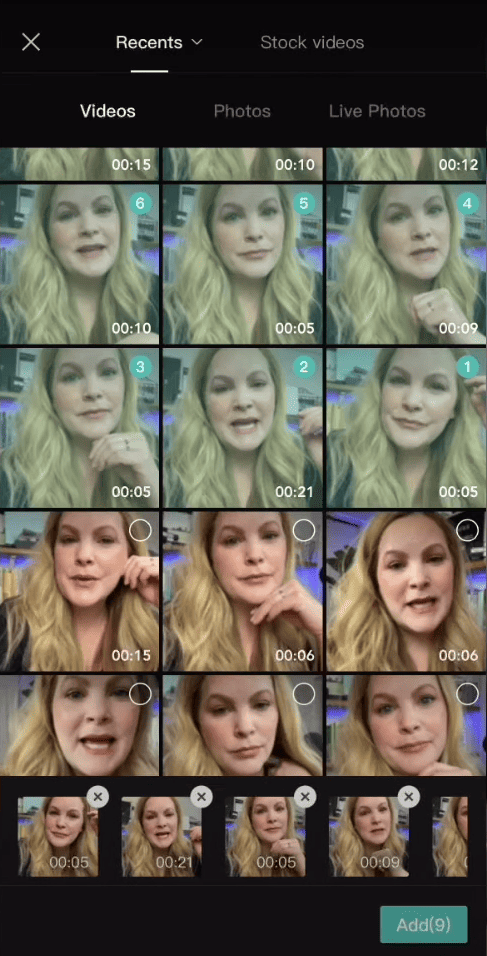
In the top right over there, I tapped that blank circle because I know that I want to import that. And you can see we went from one to two to three, but you can browse each of your video clips like I just did. Or if you know which clips you want to import, you could go through and check off all of those. At the bottom, it says Add(9). And you can see I even have a little bit of a timeline already being set up for me here. So we’ll hit Add(9), it’s going to take those clips and add those to the CapCut timeline.
So using the BFF process that I mentioned, we’re going to start with basic edits. Then, we’re going to fine-tune those edits. Lastly, we’re going to make it fancy. Even if you’re thinking you don’t really need a fancy video, trust me. You’re going to want to do some of those things.
Basic Video Editing With CapCut for Beginners 2022
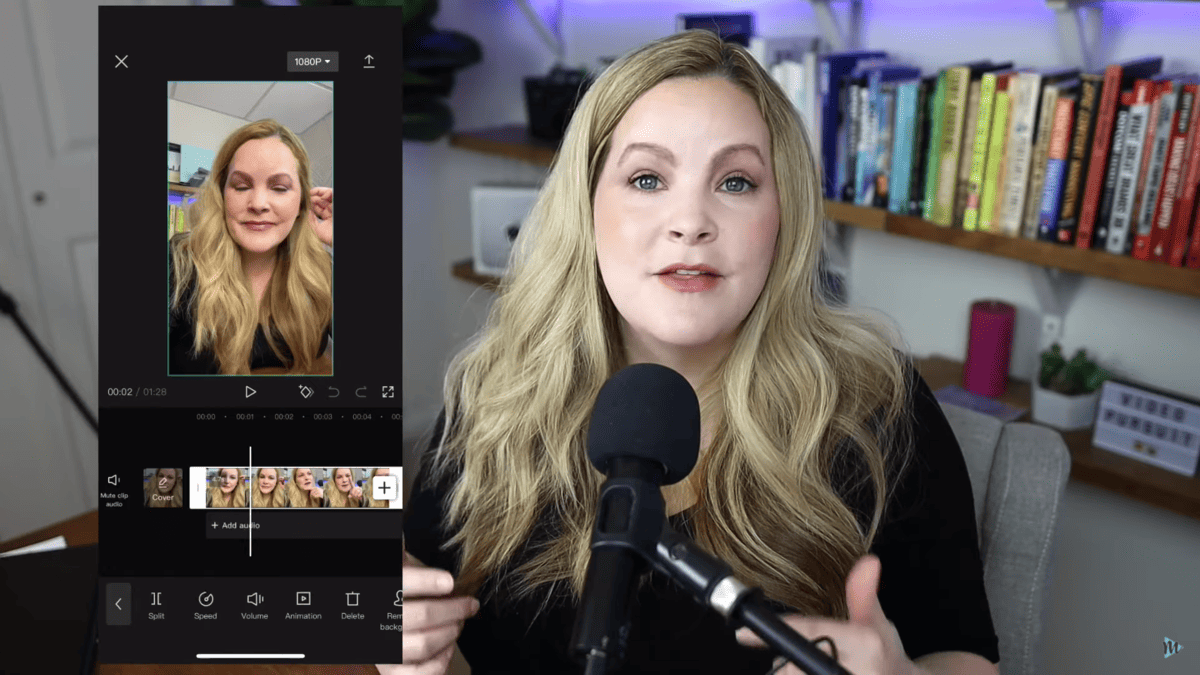
So let’s dive into the basic editing functions of CapCut. So following the BFF method, we have already imported all of our A-roll clips to the timeline. A-roll is where we’re talking to the camera. Kind of like what I’m doing most in my YouTube videos. The next thing we want to do is go through and trim those timelines. What do I mean by that? Well, when you’re recording a short-form vertical video, especially for Tiktok reels or Instagram shorts, you want to make sure you’re not wasting the viewer’s time. You want to hold their attention. You know what they say, we all have the attention span of a goldfish, right? So we want to trim the beginning and the end of each clip. Those are any parts where we’re taking a breath, or even taking a moment to gather our thoughts.
Trim or Split Clips on the Timeline
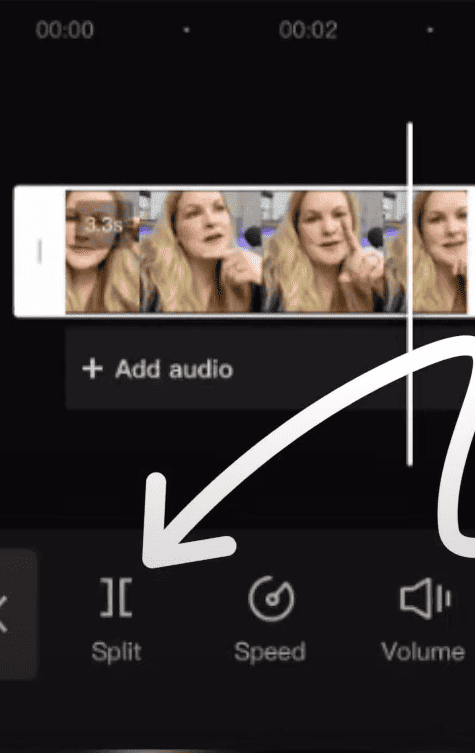
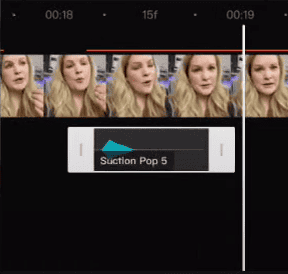
To do that, I’m going to just scroll with my finger to about where I start to see my mouth move then I know that’s where I start talking. With your fingertip, grab that handle on the left-hand side and just pull it over. It’s going to snap to where your scrubber bar is. That vertical bar there right in the middle.
The other way of doing this is to find the spot you want, and put that scrubber bar in this spot where you want to make a cut or make a trim. As long as that clip is selected, you’re going to hit split in the bottom left. And that’s going to split that clip into two sections. Now I’m going to take my fingers, and I’m pinching to zoom here so that you can see we have our split right about there. That little white square, if you tap it, that is how you can add a transition between these two clips. We’re not going to do that quite yet.
Delete and Re-arrange Clips in CapCut
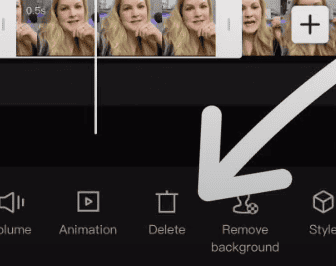
Now you can treat the second clip just like any clip, or maybe you just want to delete it. So as long as it’s selected, just hit that trash can at the bottom, and it will delete the clip. So there are two different ways of trimming your clips. Either trim the end so that you just have where you’re talking. You’re kind of trimming out where you’re not talking. Then, split your clips and delete the parts that you don’t want.
Moreover, I want to show you one thing that you’re going to want to know, and that’s how to rearrange those clips. Let’s say you want to move a clip. You’re going to select it, so it’s selected just like this. All you have to do is hold and drag it until it’s already in the part in the timeline where you want it.
Captions in CapCut


So to finish out the basic edits for this BFF process, we have titles and text. Now, here within CapCut, since I’m creating a short-form vertical video, I like to put captions on my videos because I do upload them to TikTok, Instagram reels, Facebook reels, and YouTube shorts. The captions for those are all kind of different and they vary. I’d like to just edit them one time and then upload them with captions. So this is actually one of my favorite features of CapCut, I’m going to come down under “Text”, I’m going to tap that, and we’re going to choose auto-captions. We’re going to use the original sound, then hit continue.
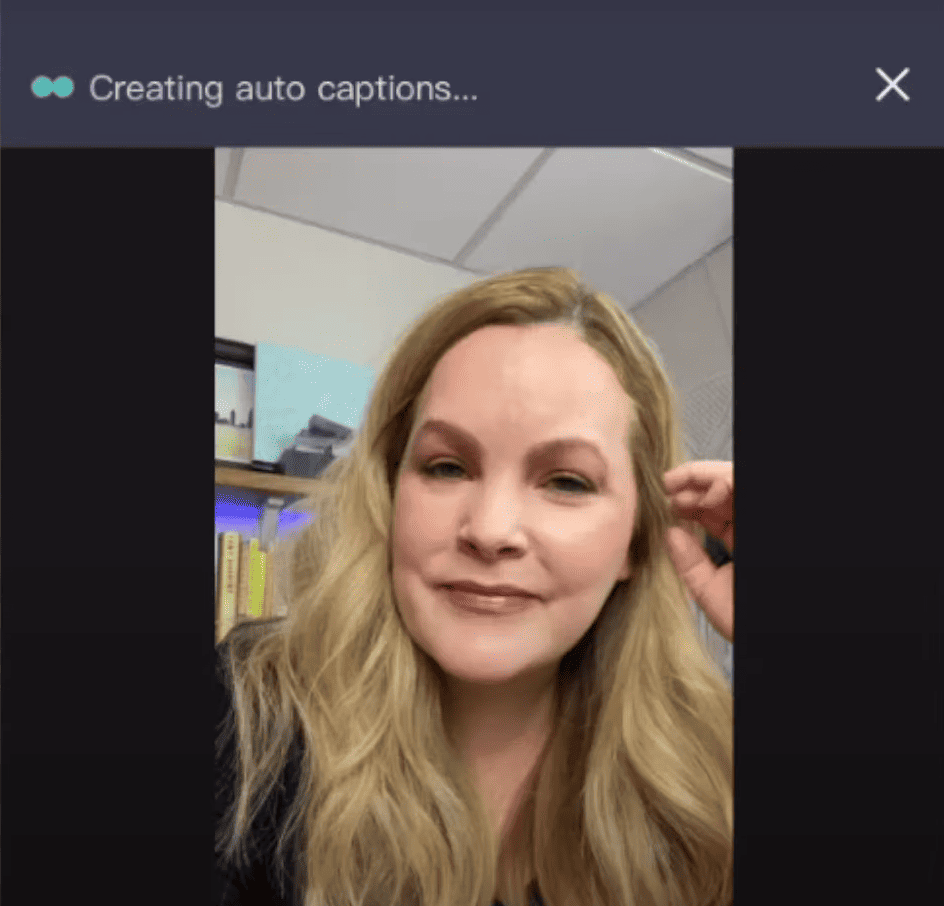
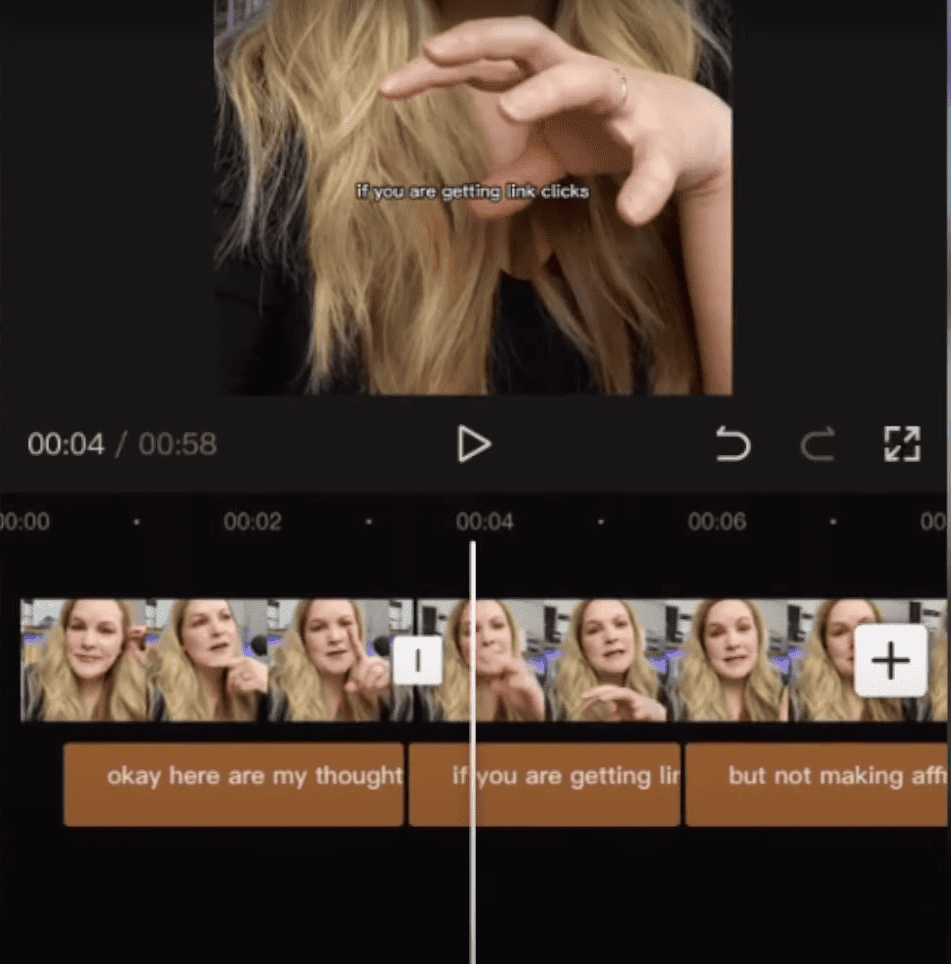
You can see at the top that it says it’s creating auto-captions. You can see them below my video clip there on that timeline. So if you select it, you can kind of edit it just like you would a regular clip. If you wanted to change the timing, you know how long it’s on the screen, you could trim it. To edit, we double-tap it. I like to put my captions on more than one line if they’re getting a little bit too long. So we’re just going to go through, double-tap each of those, and make sure that it makes sense.
Caption Styles
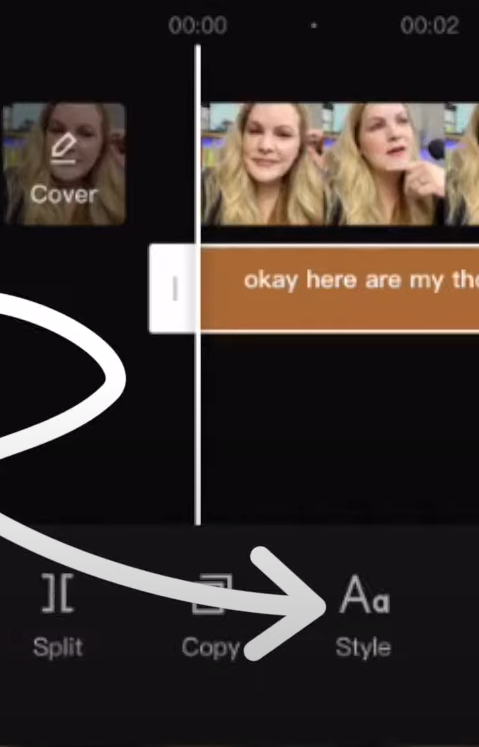
So once you have all of your captions edited, then we can look at changing the style of the captions so they’re a little bit easier to read. Now I usually take mine and raise them up just a little bit. And then down here under Style, you can choose the different types of fonts. I just keep mine with the main system font, I think that’s the easiest one to read. You don’t have to get crazy with it here. And then come over to style.
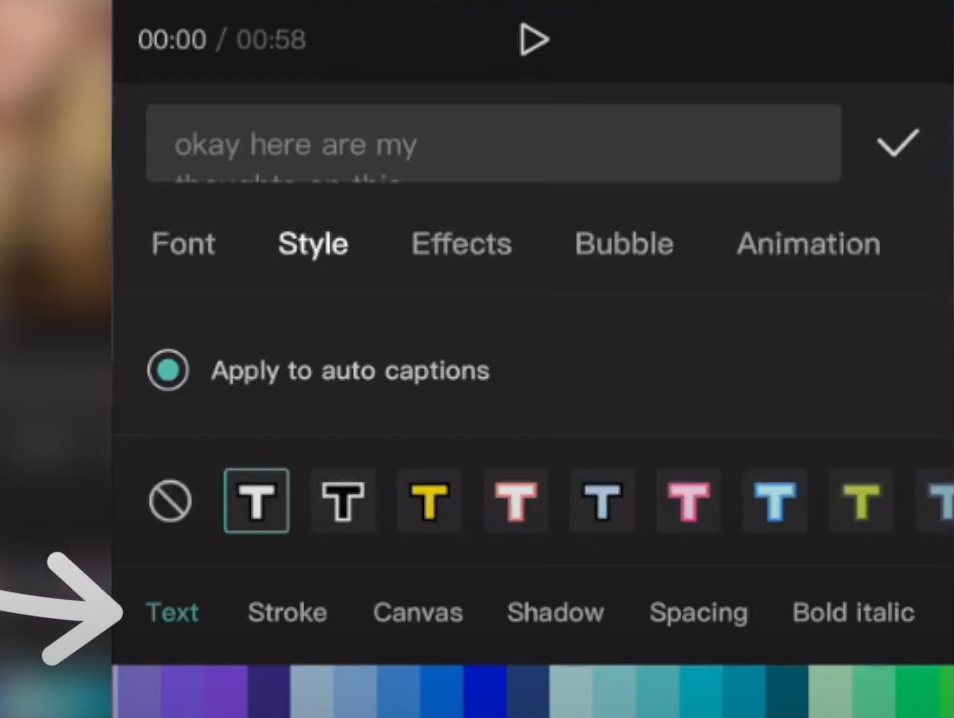
What I like to do is make my text white. And then way down here at the bottom, see all these colors down here? Right above this color selection, you see text stroke, Canvas, shadow, spacing. Tap one of these, and you’re going to change the color of the text. What I want to do instead is go over to Canvas and Canvas is going to give us that background. Since this is going to be the captions, we’re just going to make it black. We already went into the fine-tune a little bit.
Related: How to Burn Captions to Videos (Titles and Subtitles)
Fine-tune Editing with CapCut for Beginners 2022
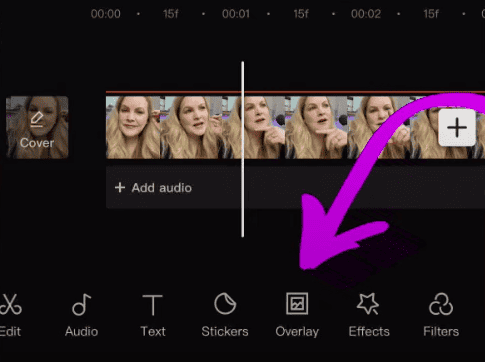
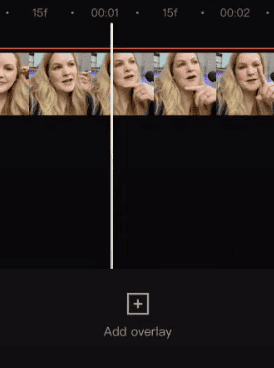
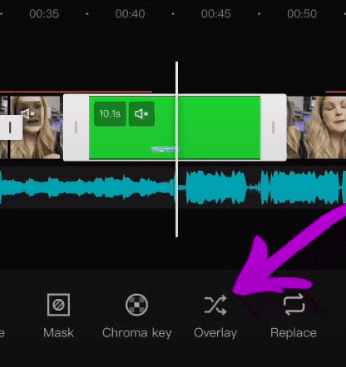
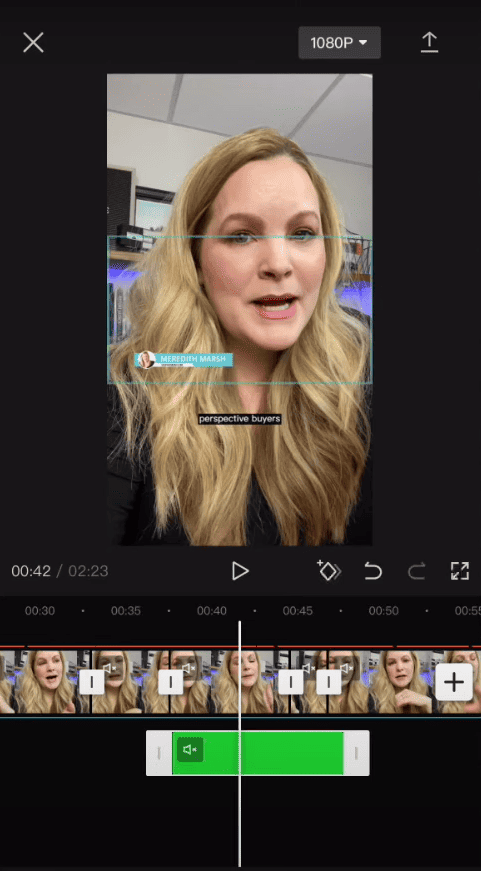
The F in BFF, that middle F there is to clean up your jump cuts. So that’s what we did when we went through here and trimmed up our jump cuts just a little bit or cut some things out. So the next thing in that fine-tune phase is to add any B-roll that you might have. B-roll is when you shoot some extra video footage that isn’t where you’re just talking to the camera but it is footage that can be on the screen. At the very bottom where it says “edit”, “audio” & “text”, you’re going to choose overlay and then hit “Add overlay.” You’re going to just simply find any video that you have there.

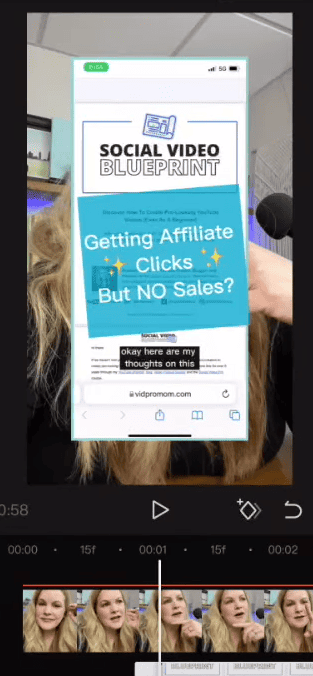
For me, I’m going to choose a screen recording that I did for the Social Video Blueprint that I’ve already talked about. I’ll choose that as our overlay and hit Add. It actually goes into the timeline on its own track and you might need to adjust it because it’s not filling out the screen. So I’m just going to pinch and make it a little bit bigger. But we can control it just like a regular video clip. We can decide where we want it to start, and we can make it a little bit shorter.
Audio, Volume, and Voiceovers in CapCut
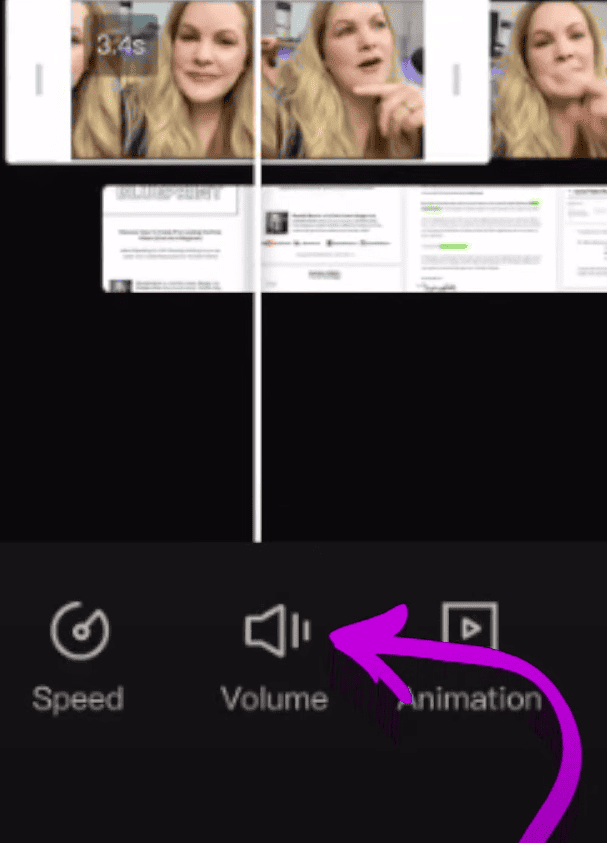
Now we’ve adjusted it, just like you would with the basic edits of your A-roll. It is still in this fine-tuning phase, but I want to draw your attention to your audio. Think about the volume, it really helps if you are wearing AirPods or headphones or something. Especially when you’re in a room without a lot of background noise, just to make sure that the video you’re creating is going to have the best possible sound for the viewers who are going to be watching it. Typically what you will want to do here is select one of your clips, choose Volume down there at the bottom, and you can adjust the volume either way up or down. So when you’re done doing that, you can hit the checkmark there.
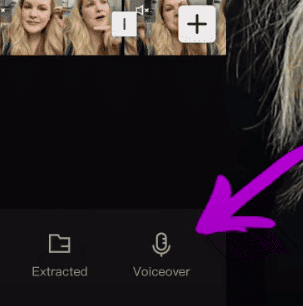
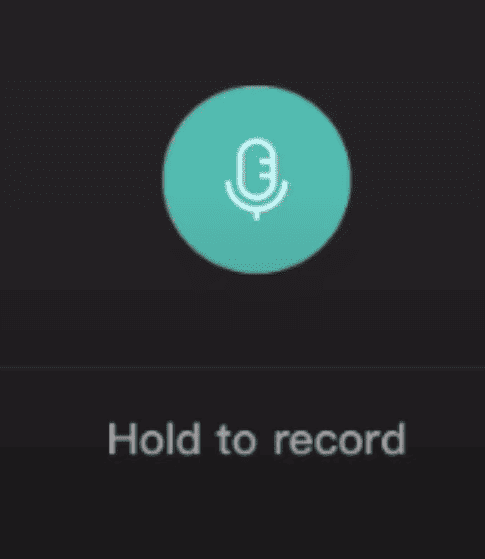
Now, voiceovers are actually pretty easy to do here inside of CapCut. You’re just going to come down to audio, you’re going to choose voiceover over on the right-hand side, you’re going to hold to record. So if I press hold, it’s going to record and you can actually watch your video playback for you while you’re talking to it. When you’re done, you just lift your thumb, if you want to start recording again, you just hold it down. And I’m just pressing and holding there as it’s recording. When I’m done, I’m going to hit the checkmark there. And then you can edit these audio recordings, just like you would if you need to trim a little off the end, the beginning, split or rearrange. So that covers the fine-tuning phase of the BFF process for editing your videos.
Add Fancy Editing Techniques in CapCut for Beginners 2022
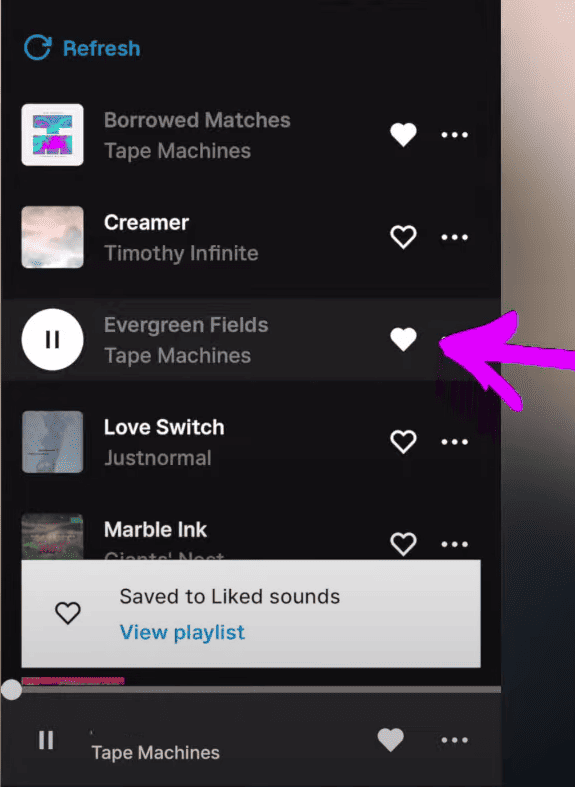
Now when it comes to getting a little bit fancy, you have to bring in a few other elements like your lower thirds, background music, or even sound effects. Now, I download my sound effects and background music from Epidemic Sound because they have a great selection. They have music in every genre imaginable. I don’t run into any copyright issues because my license covers my YouTube channel, TikTok, and Instagram. So on my phone, I’m going to browse through the Epidemic Sound website there. It’s so easy to find background music that you like and that will work for your project. I always like to hit the heart icon there, which saves those tracks that I like to a “Favorites” folder. With that, I don’t have to keep trying to find music that I like.
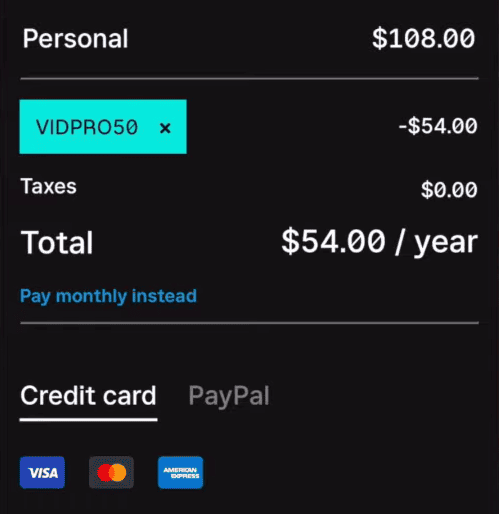
When I find something that I want to use for my project, I just download it and it will download directly to my phone. I usually select “on my iPhone” inside of the Files app on my iPhone. The best part is I’ve teamed up with Epidemic Sound to bring you an exclusive offer on their service. So you can sign up for their annual personal plan of Epidemic Sound with my code VIDPRO50. To get 50% off, just use the link in my description and then enter that code at checkout.
Background Music and Sound Effects
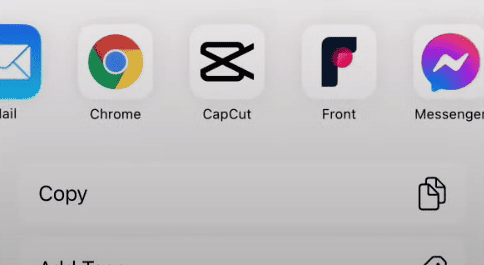
I have a few different sound effects and things downloaded. I’m going to tap and hold this one. Then, I’m going to choose to share and it’s going to ask us where we want to share it. Choose import audio to CapCut. As you can see because I had my video editor and CapCut open, that it went right here to my timeline. Now, when it comes to adding a piece of background music, we are of course going to do the exact same thing. So we’re going to come over to my files, and we’re going to go to Share. So we just tap and hold onto that file.

In the Files application, I’m going to go to share, and it’s going to ask us where we want to share it to. I’m going to choose CapCut, and import audio to CapCut. Now that we have our background music there, we can edit that background music just like you would any clip. You want to pay very close attention to the volume of that background music because it can really overpower what you’re saying. So bring that volume down to like 10% or even less. If you’re speaking in your video and you just want a little bit of background music, I’m going to import it wherever that white vertical scrubber bar happens to be and it will just create another track if it needs to.
Import Lower Thirds

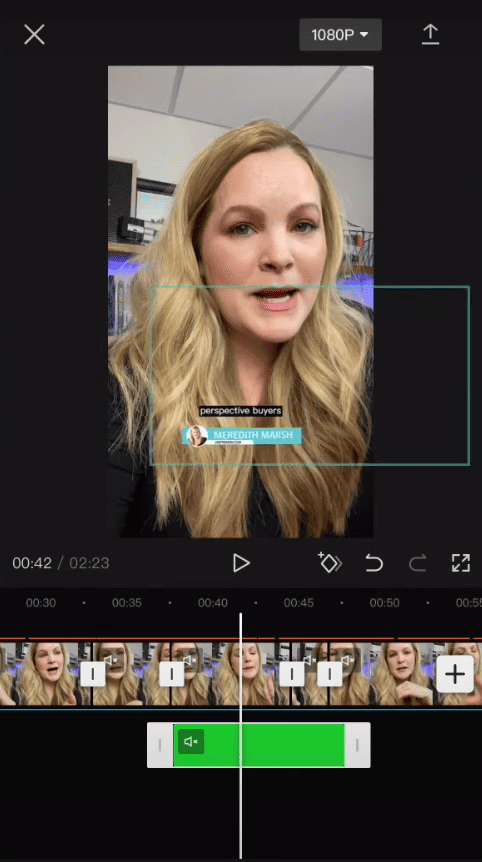
Okay, now what about your lower thirds like where you want to have your name come on in animation while you’re talking? Well, in order to do that, you’re going to have to have an animation file that has a green screen like the one that I have here. So this is my lower third from my YouTube videos. As you can see, it’s animation but the screen is green. So we’re gonna get rid of the green. But first, we need to import it into our project.
Down at the bottom left, I’m going to hit Share. Again, the same thing, we’re going to come over there, share it with CapCut, and import our footage to CapCut. And now it’s there as its own clip, we want it to be an overlaid clip, right? So we’re going to make sure that it’s selected, we’re going to slide over in our menu at the very bottom, and choose overlay.


Now, that clip is there as an overlay, but it’s still green, we have to get rid of that. So we still have that clip selected. And I’m going to come all the way over there again until we get to chroma key. And what this is going to do, you can move using your finger to just move that target around, so it’s on the color that you want to get rid of. So we have it on the green color. And then you’re going to choose the intensity button, it’s all the way down to zero, and that slider is all the way down to zero.
If you slide it up, you see that it starts to go away. So just when it starts to go away, you’re going to hit that checkmark on the bottom. Now it has this aqua-colored outline around it. That’s because the clip is selected, if I tap off and deselect to the clip, there’s no outline, right? So it just lets you know this is the clip that’s selected.
Now, all we have to do is change where it is on the screen. So when that clip is selected, you could just drag it wherever you want it to go. I’m going to pinch-zoom with my fingers. Then, I’m going to deselect and watch that one part. So we had our background music, and then remember, I had muted my audio. That’s why I couldn’t hear myself speaking, but I could hear the background music.
So that’s how you can get a little bit fancy. Just import your background music and any sound effects you might have. If you have something kind of popping onto the screen, just make sure you edit that audio and bring the volume of those things down. Then, bring in your lower thirds, place them, remove that green background, and you have yourself a really fancy ad.
Conclusion
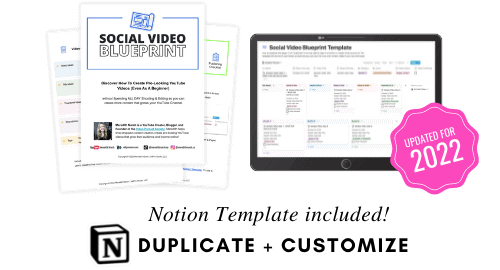
Now, you have already seen all of the different functions that you have within CapCut. There are a ton of editing tools we just covered, the basics, the fine-tune, and the fancy. That is the BFF process. Don’t forget everything about this CapCut Editing for Beginners 2022. The BFF editing process is laid out inside of the Social Video Blueprint, which is a totally free download. It’s a PDF. It includes my entire editing workflow, the BFF process, my block script process for planning out your YouTube videos, and a content organizer that you can copy for yourself so that you can stay organized. When you are organized, your editing will be so much faster, you can create more videos and really grow your audience by being consistent with your video content.
Related: iMovie 2020 Complete Tutorial
VIDEO: CapCut Editing Tutorial for Beginners (2022)
Click here to subscribe to Meredith Marsh on YouTube.
Discover How To Create Pro-Looking YouTube Videos (Even As A Beginner)