iMovie 2020 – Complete Tutorial for Mac
If you’re ready to learn iMovie 2020 on your Mac, here’s a complete tutorial walking you through how to use the current (2020) version of iMovie on your Mac or MacBook Pro or Air.
Click here to subscribe to Meredith Marsh on YouTube.
Some product links in this post are affiliate links, and I will be compensated when you purchase by clicking our links. Read my disclosure policy here.
iMovie 2020
Beginner’s Guide for iMovie 2020
In this blog, you’re going to learn the basics of editing videos with iMovie. And if you’re a total beginner, this is perfect for you. Now, most people struggle with the concept of editing videos for YouTube, or even just for fun. It’s hard to know where to start. It’s confusing. It takes time to learn.
Most people, when they hit a roadblock, just give up on their video project. But I’m guessing your project is important, so I’ll tell you a secret. The concept of editing videos is relatively the same across all video editing apps. It’s just a matter of knowing where all of the right buttons, tools, and features are.
So before spending hours, or even days, trying to “trial and error” your way through learning iMovie by yourself, make sure to follow the complete iMovie series here on my blog and my YouTube channel.
Getting Started with iMovie for Mac

Now we’re going to dive into iMovie. It is an app for your iPhone and your iPad, but for this video, I’m covering iMovie on the Mac. So the first time you open up iMovie on your Mac, you’re going to have this blank screen there. That is your “projects” menu.
If you’ve never used it, you won’t have any projects here and we’re going to actually create one. Hit the big plus button at the top left-hand side, which gives you the option to choose between trailer or movie. The trailer option allows you to create a sort of a predesigned Hollywood trailer kind of look. It’s a little bit hokey, so you can actually just choose “movie”.
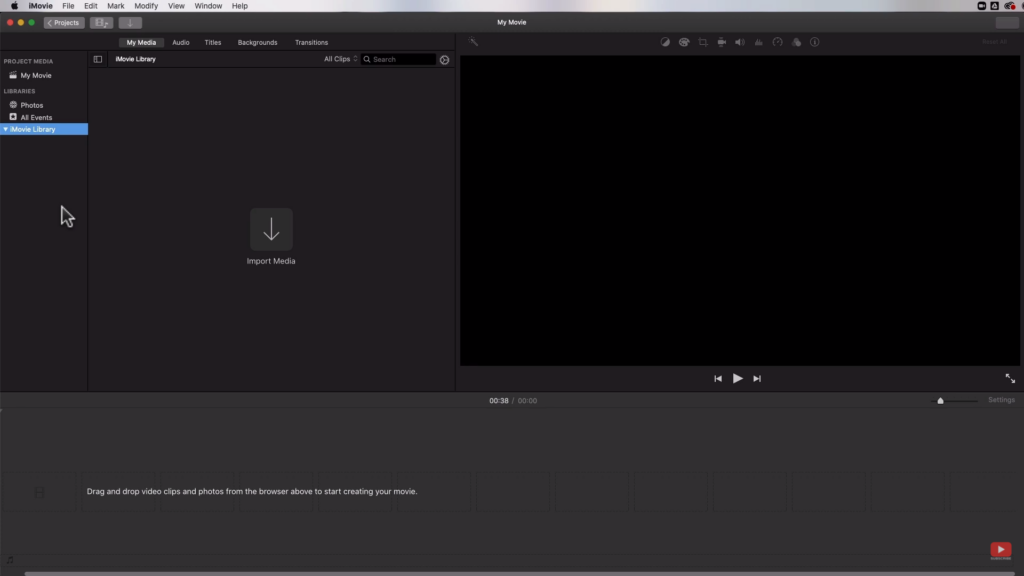
From there, you’re going to have to import your media. So the video files that you have on your hard drive, you can import them from here. Also, if you have photos and videos in your actual photo library, you could import them as well. Just hit the down arrow to import media. That is going to open up a window where I can select where I want to import my media from.
Importing Media
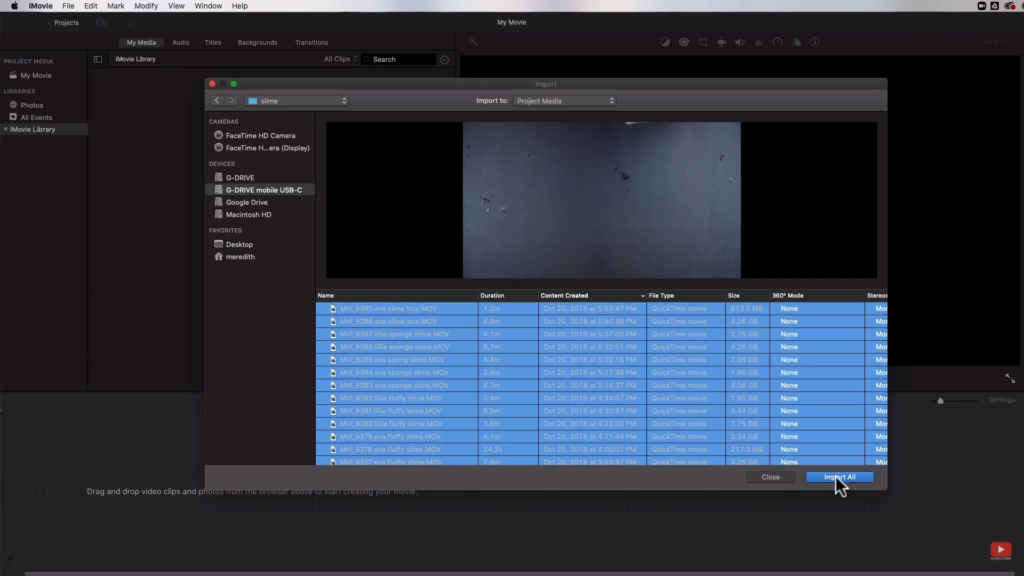
So I have some video files from a video that my kids recorded of themselves making slime. Since I’m going to use and import all of them, I’m going to hit “import all” on the bottom right. Now when you have your files right inside of iMovie, you can now get started working on your project. One thing to note here is that unlike most video editors, iMovie actually saves your project as you go. You don’t actually have to save it.
One thing you’re going to want to do is if you hit the “projects” button to go back to your “projects” menu, it’s going to ask you to name your movie. And now you’re going to see that you have the movie there in your project. So anytime you open a movie, it’ll be there for you. All you have to do is double click.
iMovie 2020 Interface
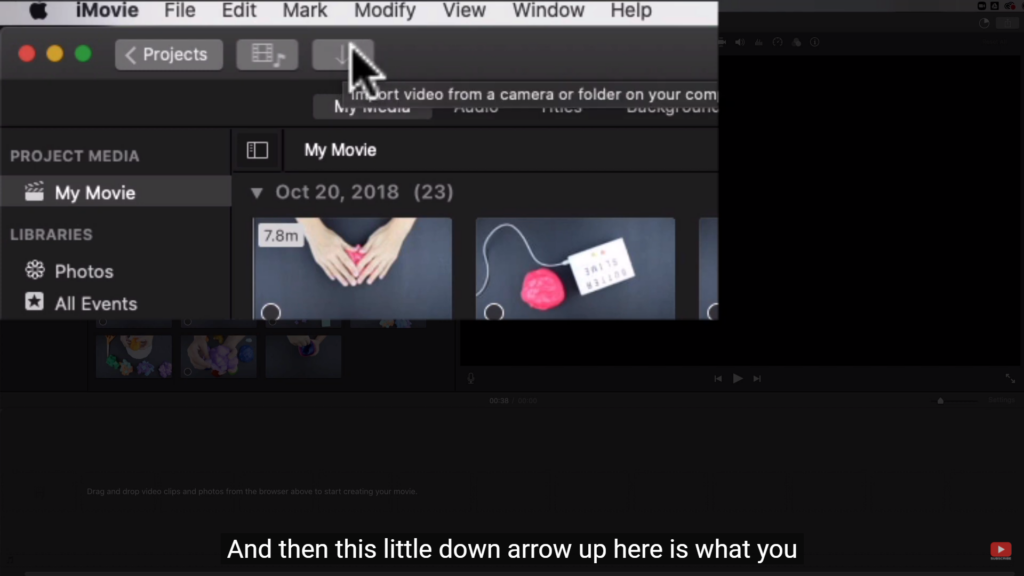
Before starting the actual editing, I want to show you around the iMovie interface. A huge part of learning how to edit videos is figuring out where things are. Know what the buttons do and how to actually make stuff happen. Up in the very top-left, you already know where to go back to your projects and menu. You also have the option to hide or show your menu and your media files. The little down arrow is what you can select if you want to import any other video clips to your project.
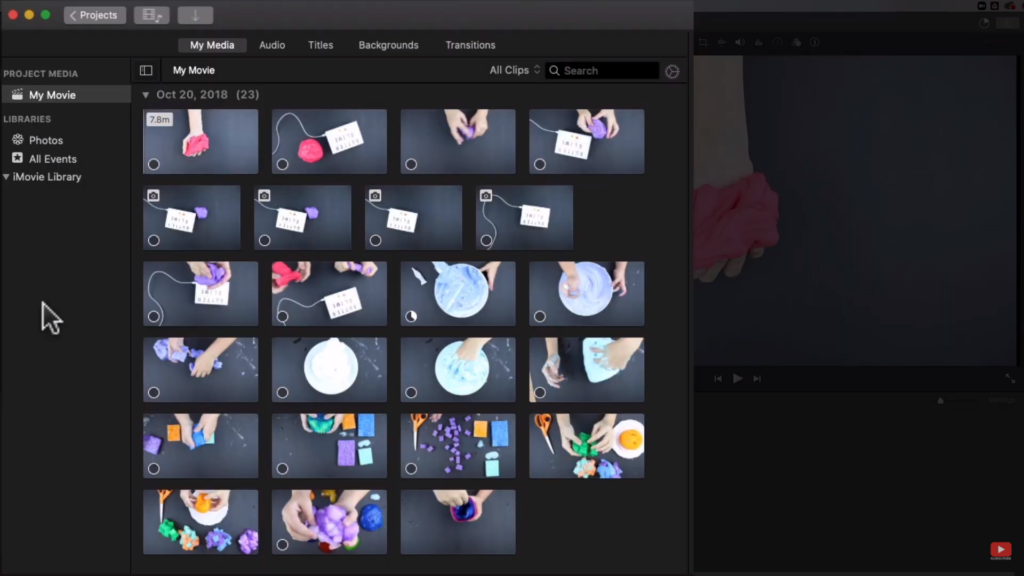
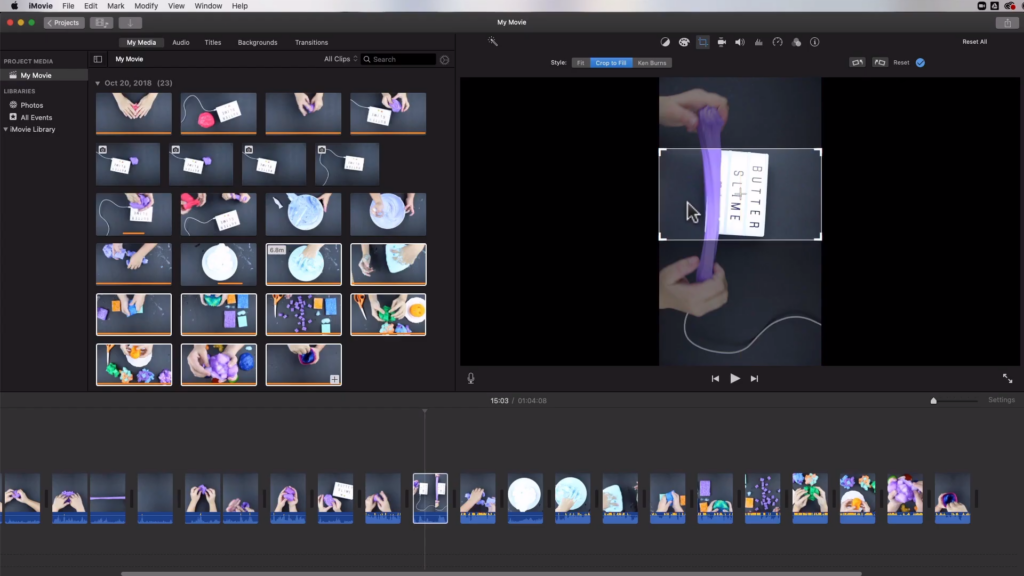
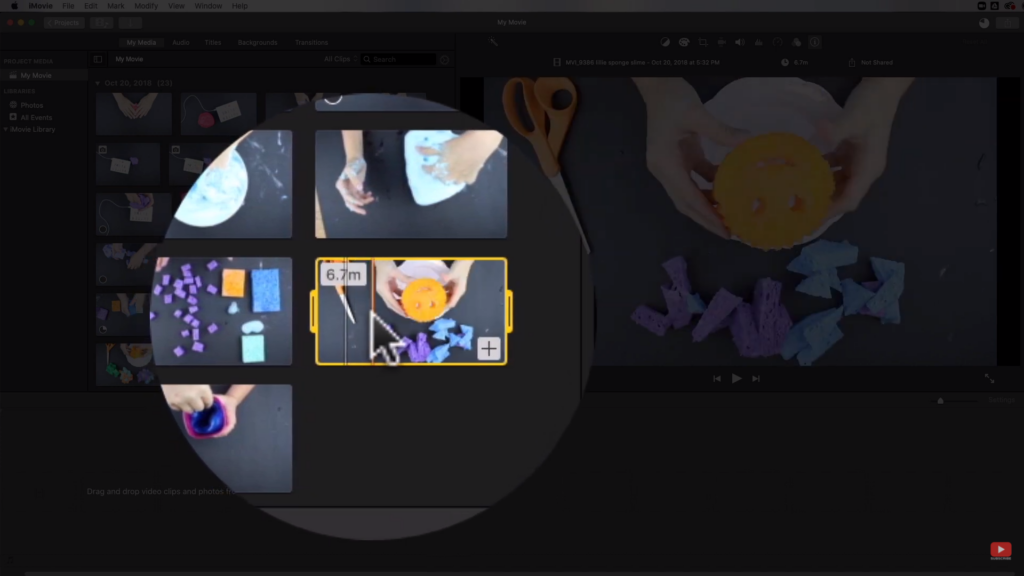
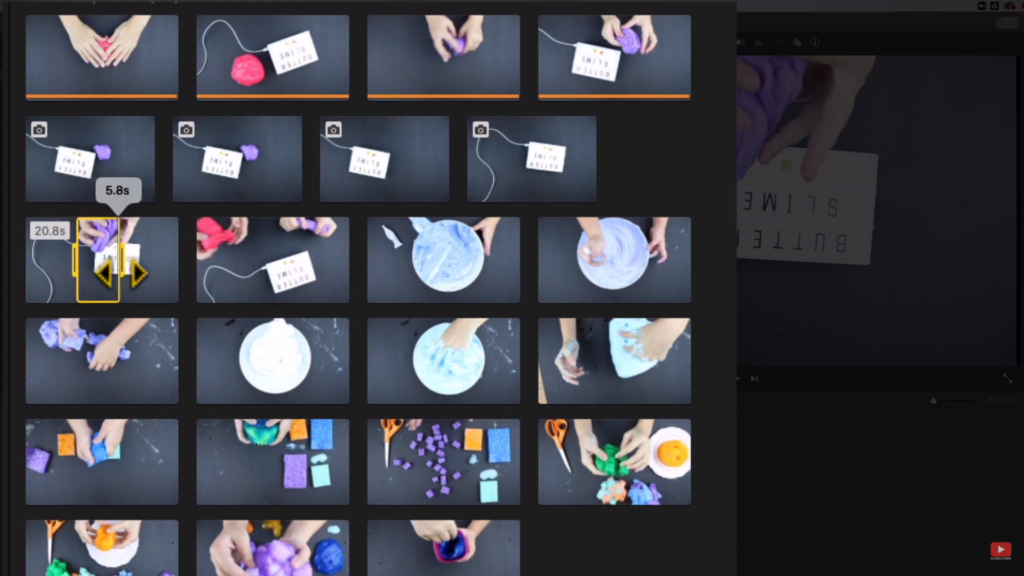
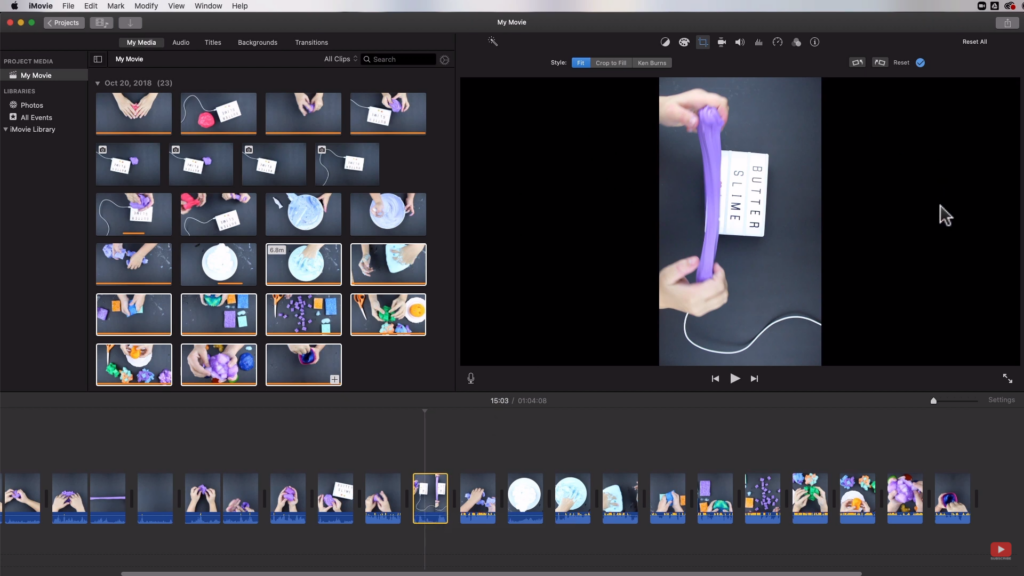
On the left-hand side, you have your project media, your libraries. All of the video files, audio files, any titles you create are all going to be on the left-hand side. So you can select “my media” there. It’s going to show you all of the media. So for example, you have some files in there that are still images. You can see the little camera icon up in the very top-left of the yellow outlined clip. That is a still image. So it will show your still images and your video files.
Moving on, the huge gray part on the lower part is your timeline. And that’s where all of the editing magic is going to take place. The big black box that’s almost on the whole upper-right side half is your preview window. So that is where if you select a clip, you can see what it is. You can see what’s going on. So you’re previewing this clip.
Different iMovie 2020 Tools
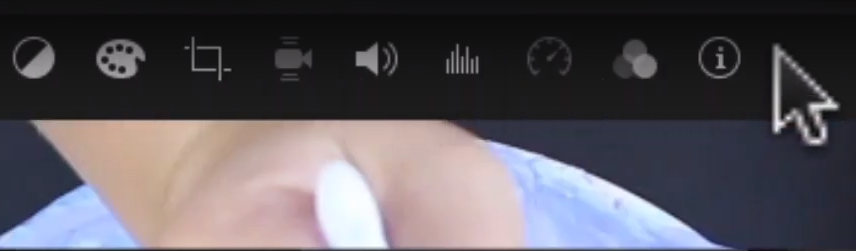
Above that, you have a menu. That is an important menu because it’s where a lot of the functions and features are that you’ll need to implement. If you just hover your mouse over those tools, you’ll get the function of each of those things.
So the little magic wand will automatically improve the video and the audio quality. The color balance tool lets you decide to automatically balance the color or balance it by yourself. The little paint palette is to adjust your saturation, your color temperature, and your exposure. And then you have the cropping tool. The next one is the anti-shake feature to stabilize a shaky clip.
You also have volumes, so you can edit your audio noise reduction and equalizers. Then, you are able to adjust the speed of the clip. You can also add a filter to the visual of the clip and add an audio effect filter as well. The little “i” icon gives you some information about the clip. The filename when it was recorded, how long it is, and those kinds of things.
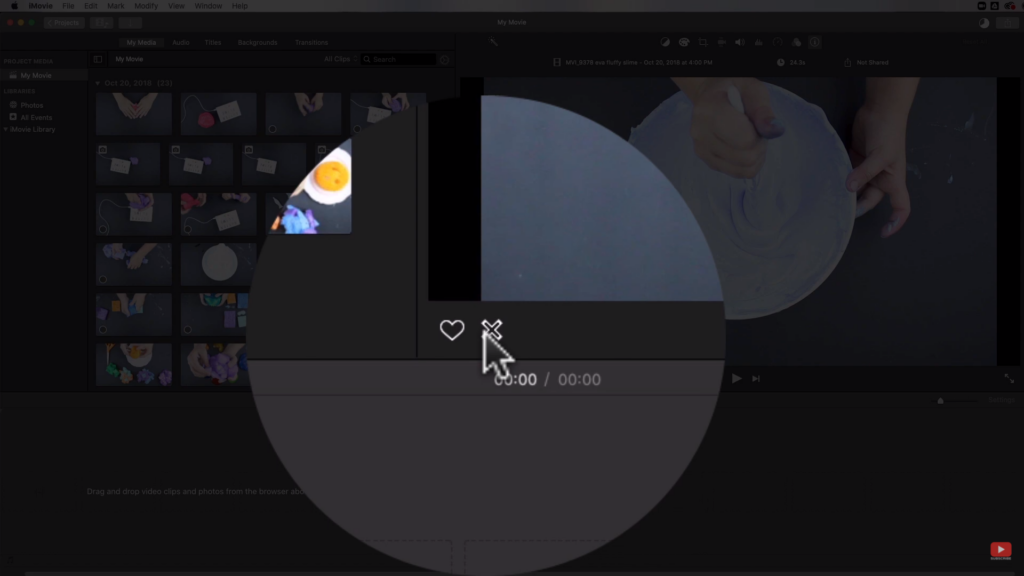
Moving on to the bottom-left of the preview window, you have a heart and an X. So if you have a video clip over here in your media section, that you definitely want to include in your final video, then you can hit the little heart button and add it to your favorites.
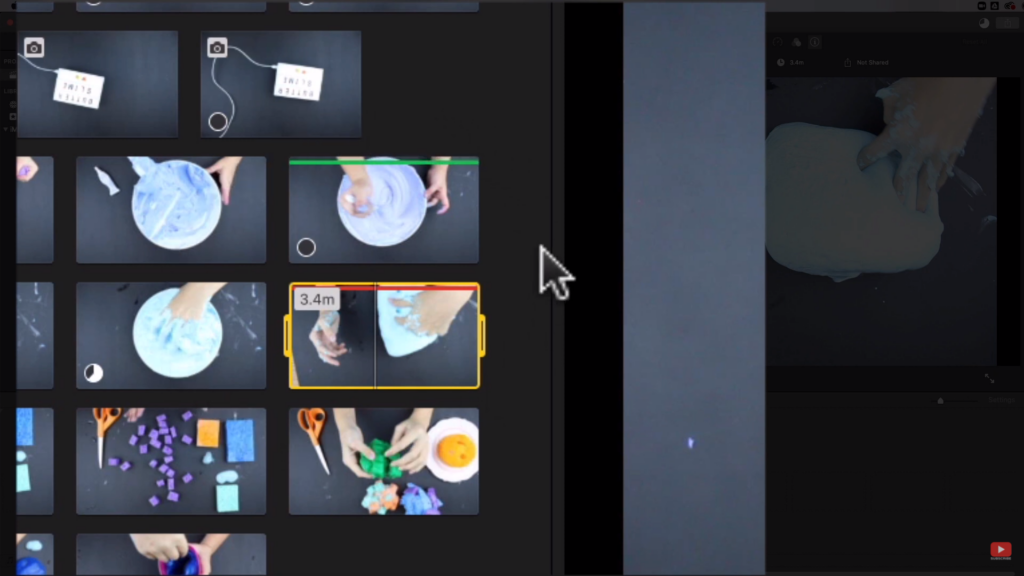
If there’s a clip that you don’t want to include in your final project, you can hit the X button. You can see between those two clips, we have the one that’s marked as a favorite with a green line. So you can think of green as being “go.” That’s a good thing. And the one that we have rejected, It has a red line. In the middle, you have the play button so you can hit play. It will just simply play the video for you. You can also hit the space bar to play and pause these clips.
If you want to do it really quickly, all you have to do is just select a clip. Then, just use your mouse to drag from the left of the clip to the right of the clip. You can do it as quickly or as slowly as you want to. Essentially, what this is called is “scrubbing through a clip”.
I’m just doing it quickly to do a really quick preview and find exactly what I’m looking for. Also, to make sure that this is in fact, the right clip that I’m trying to preview. And the button over there in the bottom right of the playback window, if you hit that, then your video is going to go full screen and you can preview the clip in full screen. Then all you have to do is hit the escape button on your keyboard to go back.
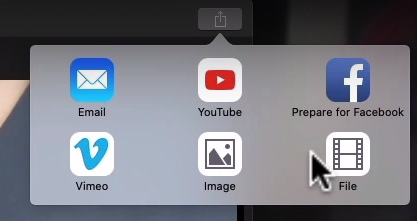
Last but not least, a very important button that you’re going to need in order to complete this project, is the share button in the very top right. You have a couple of different options to export your video file, and I’m not going to go too in-depth here because we don’t have anything to export yet. Also, I have a complete tutorial step-by-step on exactly what to do to export your iMovie file so that you can upload it to social media and save it on your computer. So the file option is the one that I would recommend and suggest that you use rather than the email, YouTube, Facebook, or Vimeo option.
Related: Best Computers for Video Editing
Editing on iMovie
So now that we have our iMovie interface tour out of the way, and you know where everything is now, you can actually start editing video. And there are a couple of different ways that you could go about doing it. What you want to do is get the clips that you want in your final video, down into the timeline.
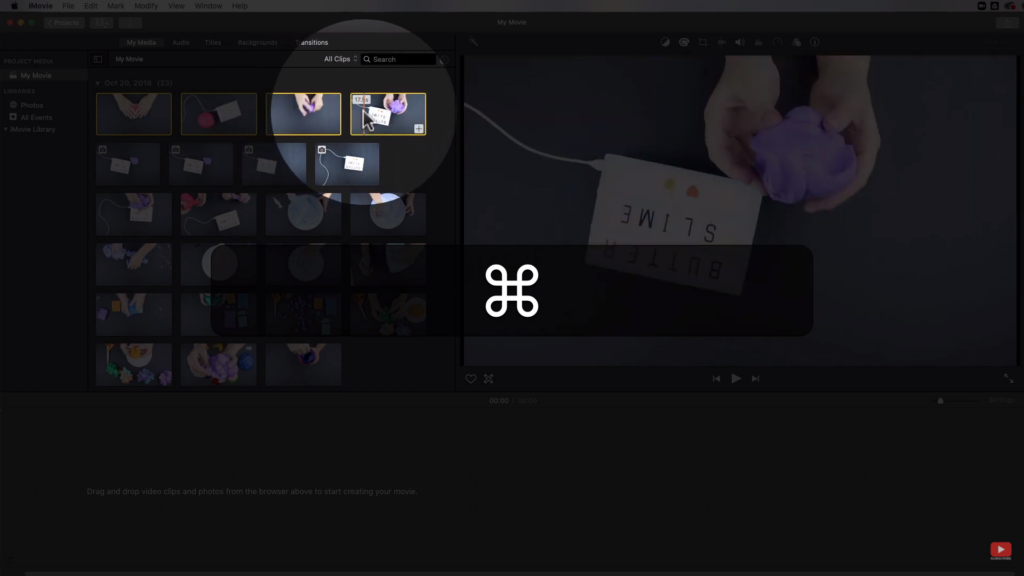
So for me, what I might do is select one of the clips and then hold down the command key on my keyboard while I select more. And then I’m going to click and drag those down to the timeline. You can actually zoom in on your timeline a little bit so you can go through there and figure out what you want to keep and what you want to get rid of.
One of the things that I really like to do is focus on the things that I want to keep in my video, rather than trying to look for all of the stuff that I want to delete from my video. You can zoom in on your timeline and out using your keyboard by hitting the command+plus button to zoom in or the minus button to zoom out.
Trimming
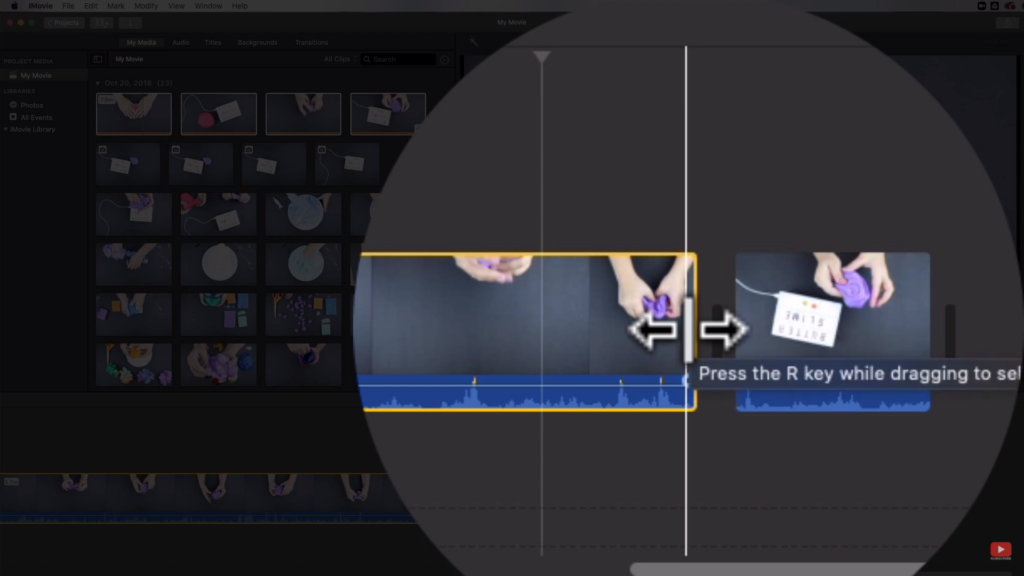
There are a couple of really important functions that you’re going to need to know. The first one is trimming your clips. You can see the clip above is a little bit longer than the other clip. The easiest function is to trim the clips. So you want to make sure the clip is selected. Then, if you hover over the very tail end of your video clip, you’re going to get the little bar with the two arrows going left and right.
Just click and hold and then you can drag the end of the clip over to actually trim that clip. Now, if you do something and you’ve decided that it’s not what you wanted to do, no problem just command+Z on your keyboard, and it’s going to undo that for you. It works the very same on the front end of a clip.
Splitting
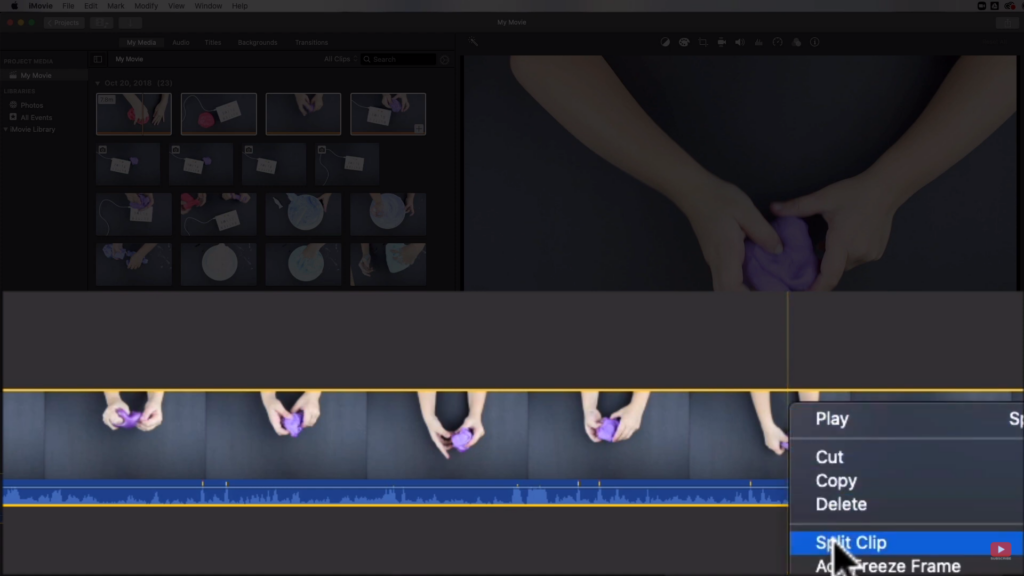
Now, if there’s a section in the middle that you want to cut out, you need to do something other than just trimming the ends, right? So that is where you would split your clip. So right where the vertical yellow line is, if you want to split your clip right there, all you have to do is right-click. Then, it’s going to give you a little menu there, and just select “split clip” or do a command+B on your keyboard.
You could also just select a clip and hit delete on your keyboard and it will go away completely. And if you wanted to, you could actually move the clips around by just clicking and dragging the clip and dropping it back down into the timeline, and move things around in whatever order you wanted.
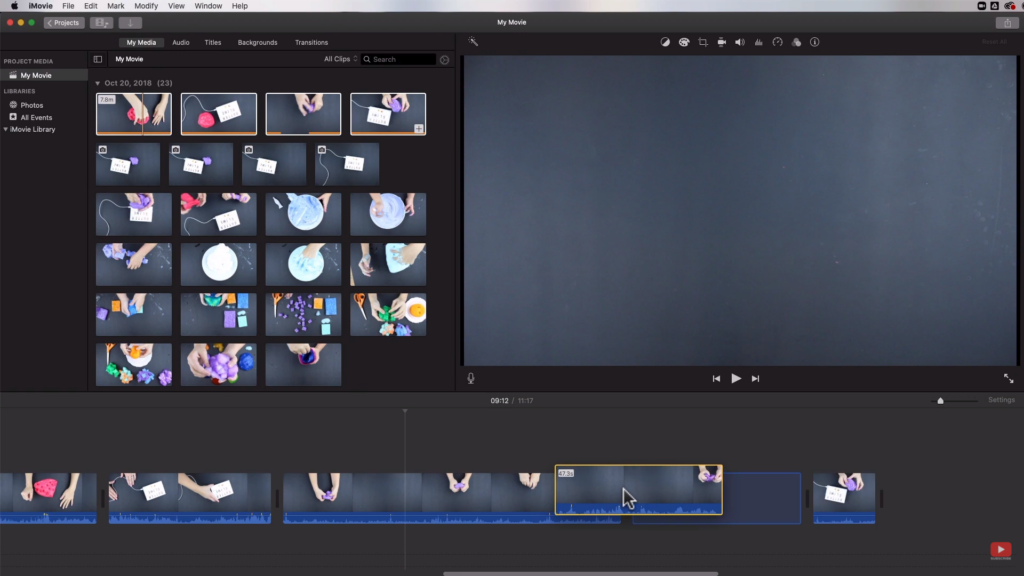
Now, if you make a bunch of splits and trims and you reorder everything, and then you see you messed up. You can come up to the original clips. They’re still in your media section, right? And you can see that you have those orange bars at the bottom of the clips. So you can see which parts of these clips are actually in your movie. If you want to redo the whole section, you could drag the clip back down to your timeline. Then you will have the whole video clip here that is unedited, and you can essentially start from scratch.
So don’t be afraid to play around with things. Don’t be afraid to press buttons, try things, split your clips, trim your clips, because you can always go back and redo something.
Another Way for Trimming Video
Now, I’ve told you that there are a couple of different ways you can add clips to your timeline. Let’s say we know that we want a part of a clip, but we don’t want the whole entire thing. Before we add it to our timeline, all you have to do is trim it before dragging it down to your timeline.
So you can keep going and add what you want to your timeline, make your trims and your splits, reorganize everything if you feel like you need to. You may not even need to do that, but what you are essentially creating is a rough draft of your video.
My recommendation is to get everything down on your timeline that you know you want to have in your video before you go messing with any of the other features and functions. This would include any of the color corrections, cropping, slow motion and fast forward, or your transition. You want to have a good foundation of your video that you can start from before you spend time messing with the bells and whistles.
Adding Transitions
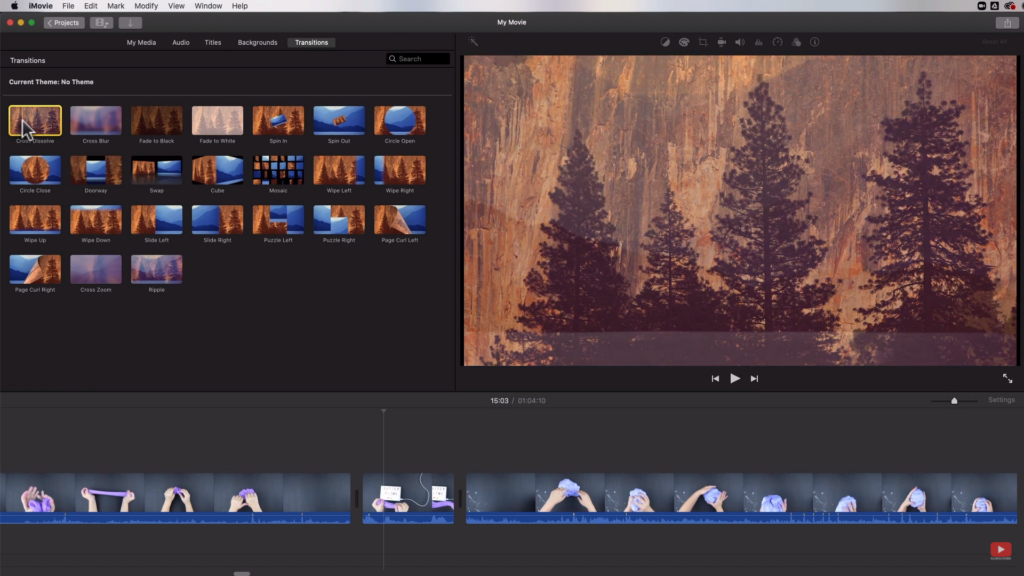
Now, I want to show you how to add transitions between your clips. It depends on the look that you’re going for with your video. You may or may not want to add transitions between your clips. So what the heck are transitions? Transitions are things that you can add in between your clips when you’re going from one clip to another.
Now, personally, for me, when I’m editing my YouTube videos, I don’t usually have any kind of fancy transition at all. But you may want to incorporate those. Probably, the most used and the most gentle transition is a crossfade.
Basically, it’s fading from one clip to another clip. The first clip is fading out while the other is fading in very slowly to your frame. You have all those other transitions available to you, like the cross blur. Instead of fading out, it’s going to blur out and then blur back in again. You also have a fade to black, fade to white, and then you have some that are a little bit crazy, like the spin in.
I would just caution you to not go crazy with transitions because they can distract the viewer from the actual content. Plus, you can waste a lot of time just playing around with those things that don’t actually help you get your video done and edited and published to share with your friends and family or upload to YouTube.
Cropping Clips
Now, there are a few of these functions up here that I want to make sure that you have, because you may need these when you are editing your video. So the first one is cropping your clips, and there are a couple of different ways that you can go about this.
So for me, my videos are being recorded in the horizontal landscape format. If you happen to shoot something that was vertical, like on your cell phone, then you’re going to have those black bars on either side.
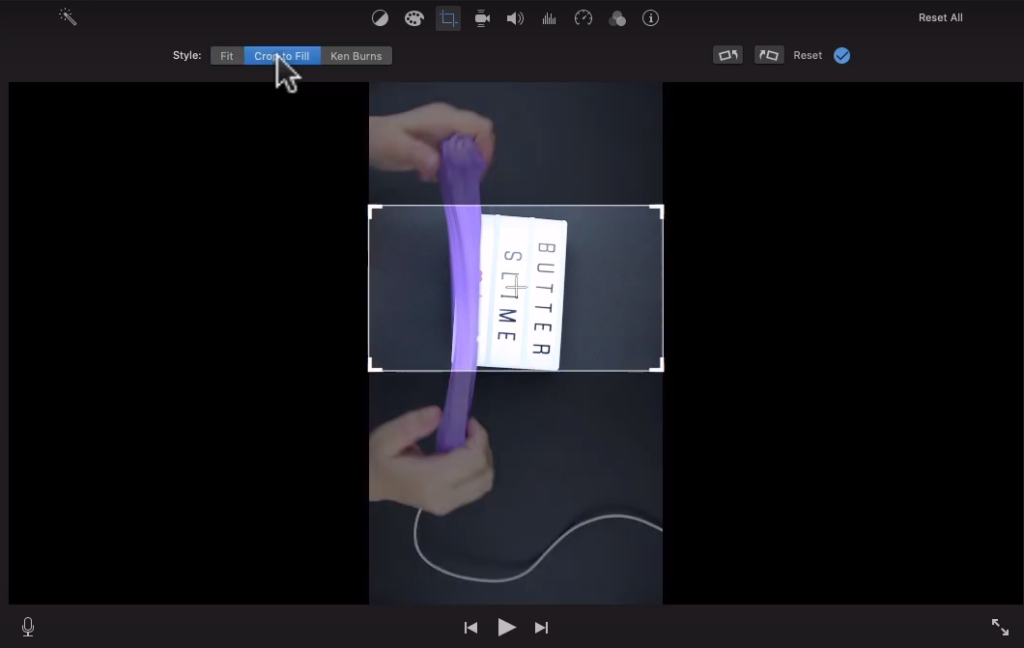
So under the cropping function, you have the option to simply fit the file into the frame or you can hit crop to fill, and it will give you the option to essentially crop your video to fill the frame.
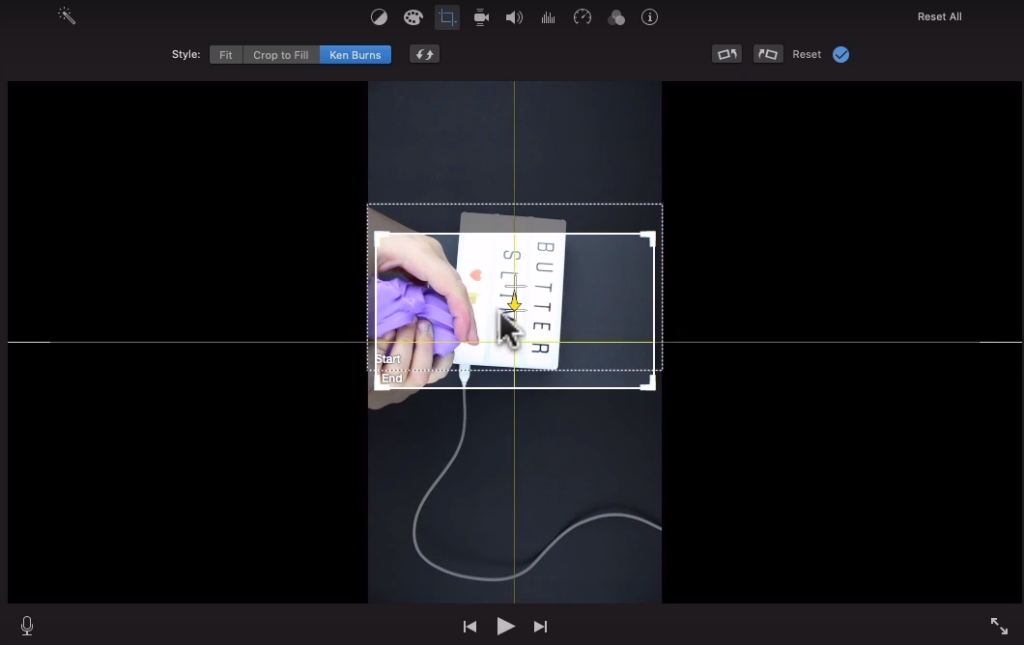
Then you also have the Ken Burns effect, which is where you can do a subtle zoom in/zoom out/pan over. It has a starting point and an ending point. So if you hit the blue checkmark, it pans from one rectangle to the next rectangle. That’s how the Ken Burns effect works.
Now, if you simply wanted to crop in or zoom in on a video clip, all you would have to do is hit the crop to fill option and then select the actual frame size that you want to have here.
Stabilizing and Speed Tab

The next option over is the option to stabilize your shaky videos. Now, for me, most of my videos were shot using my camera on a tripod so it’s not shaky. However, if I used a GoPro or a moving shot like walking around, then it might make sense to stabilize the shaky footage. Just be mindful of the fact that it can take some processing time for your computer to actually go through the clip and stabilize the footage. If you wanted to do that, you can just hit this little checkbox over at the top of the preview.
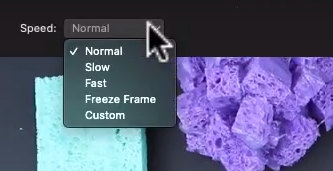
Now under the speed tab, there’s a couple of really interesting features that you can use. So under the drop-down “speed”, you have normal speed, slow, fast freeze-frame, or custom. And so you have those options available to you under the speed.
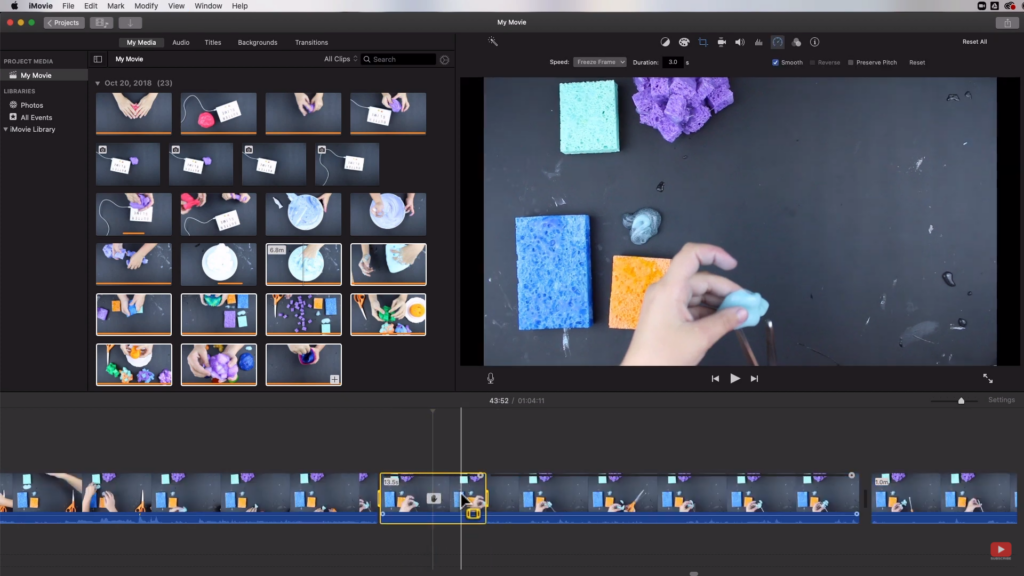
So let me show you what the freeze-frame does. Whenever you have a frame in your video that you want to create a freeze-frame, a still frame, it took the frame from where your yellow vertical line was and it made a still image out of that frame. Then, just connected it to the clip.
iMovie 2020 for Mac Tutorial
Now that you have a really great rough cut to your video and you’re happy with it, you can certainly move on to exporting the video so that you can share it on social media and download it to your hard drive.
However, if you want to add titles and text to your video, add music, do this picture-in-picture or a split-screen function, color correct, or add filters to your videos, make sure to subscribe to my YouTube channel because those are the exact videos that are coming up next.
Also, if you are completely new to editing videos and you want to get better so that you can create more polished videos for your YouTube channel, then grab my free Edit Like a Pro cheat sheet below.
Related: Video Editing for Beginners
Be sure to subscribe to the VidProMom YouTube Channel so you don’t miss fresh new videos from Meredith! Click here to subscribe now.